cards, Catalogues, Christmas

WARM AND TOASTY POLAR BEAR

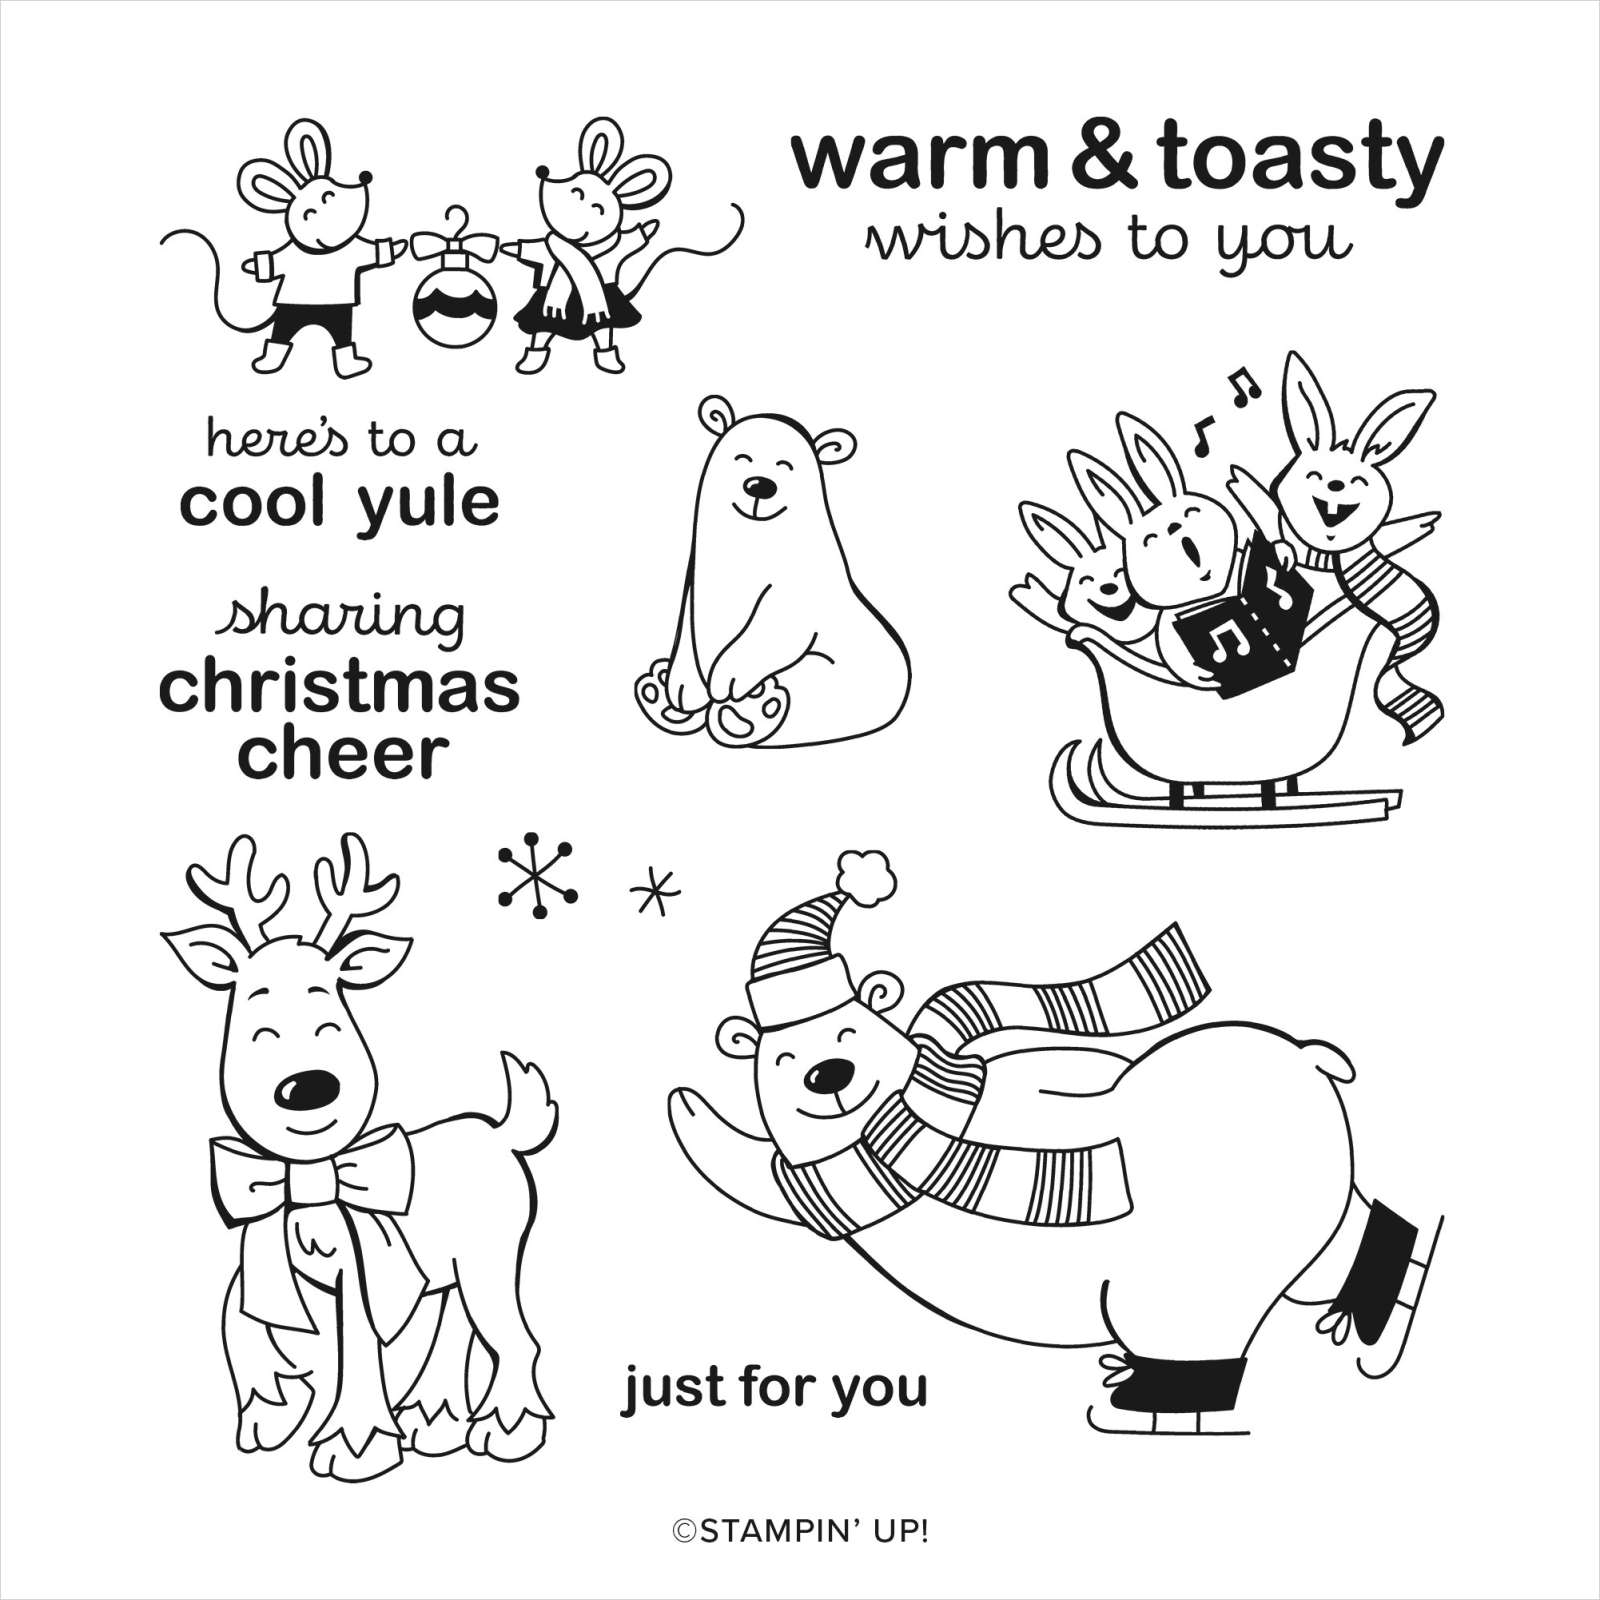
A quick post for you today with this cute little Polar Bear. He is from the Warm and Toasty stamp set from the 2020 Holiday Catalogue. Don’t you just love his happy face. 🙂

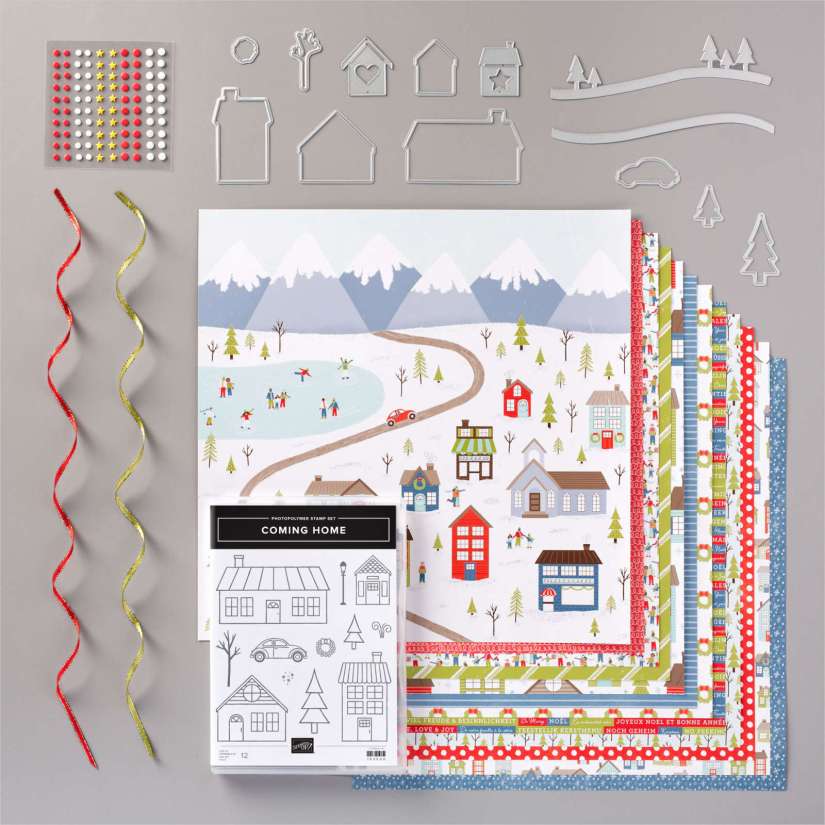
I used the ‘Tis The Season Designer Series Paper. (This is one of the paper packs for 15% off this month so you might want to grab some of this. It has some great patterns in the pack).

The polar bear is stamped with Memento black ink on white card that has been diecut with the scallop rectangle die from the Stitched So Sweetly Dies. It was then coloured with the Stampin’ Blends. The sentiment stamped on Balmy Blue is also cut with one of the Stitched So Sweetly Dies. I love the variety of shapes in this die set.

In Australia? Any of these products can be ordered through my store or contact me directly and I will help you with your order. Visit my store -> HERE.

If ordering online please use the Host Code – 9J63PU4C

Hope you like this Polar Bear card. The Warm and Toasty stamp set is just so cute.

Happy Stamping,

Jenny

cards, Challenges, Christmas, Classes, Stampin' Up!

PLUSH POINSETTIA TEAM CARD FOR WORLD CARDMAKING DAY!

Last weekend you might know was World Cardmaking Day. For a little different challenge/activity for my team I sent them all a card kit containing the same materials. I asked them to create a card with the kit and share it on our team Facebook page. They could stamp, cut, emboss, add to it any way they liked. It’s been interesting to see everyone’s cards all with the same basic materials.

I hope I can share some of them with you soon if they don’t mind. Today I thought I would share you my card I created. Of course I had to create one too. 🙂

Firstly, this is the card kit I sent out. It has a basic card base in Cherry Cobbler and a smaller card mat. The white card is slightly smaller than the card mat. The piece of Plush Poinsettia Specialty Paper is slightly smaller than the card base.

This is the card I created.

The holly from the Christmas Gleaming stamp set was coloured with Stampin’ Blends. Be sure to stamp these in Memento ink before you colour with the Blends. Then fussy cut them with scissors. No dies for these.

The card mats were diecut with the Stitched Rectangles Dies. It is hard to tell but I heat embossed the sentiment with Gold Embossing Powder. The card was finished with some of the gorgeous Gold Ribbon and a Gold Gilded Gem.

What would you create with these same pieces? If you create one drop me an email and share it with me. I would love to see.

If you would like to join the fun of my JEN’s INK team, you can join the Stampin’ Up! family. Select $235 of products and pay just $169. You can quickly do that -> HERE.

Apart from lots of fun you get a discount every time you order. You have access to products EARLY!! You get to attend some great Stampin’ Up! events. And so much more. Totally great value. 🙂

Not sure? Check 9 reasons Why you need to join the Stampin’ Up! Family -> HERE.

Have a great week,

Jenny

Stampin' Up!

A SPONGED BACKGROUND FOR COLOUR INKSPIRATIONS CHALLENGE #86

I took some time over our Long Weekend to create a card for the Colour Inkspirations Challenge. It has been a very long time since I had a go at one of these challenges.

For Colour Inkspirations #86 the colours were Coastal Cabana, Shaded Spruce and Pacific Point. I have to say I found it hard to work out how to use these 3 colours together. I found they were 3 heavy colours. I decided on a sponged background.

I have a video for you showing how you can create this effect yourself. Check it out below. (if you get these blog updates by email the video might not show up. Head to to the blog post by clicking on the title of the blog post so you can check it out there.

Watch the video below

EMBOSS RESIST FEATHERS CARD

Measurements

Thick Whisper White card base:14.8cm x 21cm scored at 10.5cm
                                                        5 ½” x 8 ½” scored at 4 ¼”
Coastal Cabana card mat: 8.9cm x 12.8cm      3 1/2″ x 5″ 
Shimmery White card: 8.5cm x 12.4cm    3 3/8″ x 4 7/8″ 

I hope you have a go at creating this card.

If you want to join in with the Colour Inkspirations Challenge then head over -> HERE.

In Australia? If you are in need of your papercraft supplies I would love if you shop with me. You can head to my store -> HERE. (please use the Host Code: 9J63PU4C)

Or contact me directly by email at jghayward@yahoo.com or phone on 0438 844574

Happy stamping,

Jenny

cards, Christmas, Stampin' Up!

WEDNESDAY’S WOW! #111 – CHECK THE SWEETEST TIME FOR CHRISTMAS!

Wednesday’s WOW! #111. I wanted to share a sweet bundle with you today – and I mean sweet. It’s the Sweetest Time Bundle. (You can find it on p21 of the Holiday Catalogue)

This is a great one for your Christmas projects with such detailed dies. The Sweetest Time Bundle includes the Sweetest Time stamp set and the Sweetest Borders Dies.

The Sweetest Time stamp set contains some ‘classic’ Christmas images with the holly, the candy cane and the 3 candles. I have to say I don’t normally go for these ‘classic’ style images.

It’s the Sweetest Borders Dies that I particularly wanted to look at today though.

With these dies you diecut the holly border. There are some positive and negative parts to it. The holly creates a great border that you can layer on your projects. By diecutting the border twice in different colours you can use part of the diecut within the negative of the other. You can see it in the sample above. That’s so fun isn’t it? What a great way to add dimension to your Christmas projects.

Check this sample out below. (created by Stampin’ Up! Artists). Let me explain it as I think it is.

CREATE A SPONGED HOLLY BORDER

Add colour to your piece of white card which is the same size as the white card base. This could be by sponging or watercolouring over it, however you like to add the colour. Diecut the holly border from the piece. Adhere the half diecut card to the white card front.

Diecut some holly. I love that you have the scored lines in the holly already. So great. Stamp the other images and the sentiment and diecut them. Adhere them to the front of the card.

Isn’t this a great Bundle? Why not add it to your Wish List.

If you are in Australia and “need” to buy this bundle now to get your Christmas creating on then I would love to help you with your order. Head to my store -> HERE.

Please use the Host Code: 9J63PU4C or you can contact me directly at jghayward@yahoo.com and I will get back to you ASAP.

Thanks for shopping with me,

Jenny

Blog Hops, cards, Catalogues, Personal Ramblings, Stampin' Up!, Tutorials

STAND UP SEASIDE NOTIONS EASEL CARD

Last post I shared a fun Easel Card for the World Cardmaking Day Blog Hop. I said that I would tell you how it was made so you can make your own. So … Here it is.

Firstly, here is the card again for you. It’s a Stand Up Easel Card.

The original idea I found on Connie’s blog -> HERE.

I will give you the measurements in Metric and Imperial.

STAND UP EASEL CARD

Base Card:

Card – 10.5cm x 28cm (4 1/4″ x 11″) Score at 7cm and 14cm (2 3/4″ and 5 1/2″). Fold on score line.

Piece of Designer Series Paper 10.1cm x 13.6cm. (4 1/8″ x 5 3/8″)

Bottom piece of Designer Series Paper 10.1cm x 6.6cm (4 1/8″ x 2 5/8″)

Front Flap:

Card – 9cm x 23cm (3 1/2″ x 9″) Score at 11 1/2cm (4 1/2″). Fold on score lines.

For Inside of Front Flap: One piece of white card 8.5cm x 10.9cm (3 1/4″ x 4 1/4″)

Piece of Designer Series Paper 2.5cm x 8.5cm (1″ x 3 1/4″)

For outside of Front Flap: Card mat 8.6cm x 11.1cm (3 3/8″ x 4 3/8″)

White card for Front 8.1cm x 10.6cm (3 1/4″ x 4 1/4″)

Piece of Designer Series Paper 8.1cm x 2.5cm (3 1/4″ x 1″)

Decorate the card as you like. You will need an element on the bottom of the base card on the front to be able to tuck the flap in to for it to stand. This can be anything you like to use.

Have fun with it.

If you need any stamping supplies and you are in Australia? Please stop by my store -> HERE.

Thanks for shopping with me. I do appreciate each and every order.

Jenny

Blog Hops, cards, Catalogues

WORLD CARDMAKING DAY BLOGHOP!

It’s World Cardmaking Day.  How great is it that there is a date that we celebrate all things cardmaking whether it be creating the cards and the pleasure it brings or in  sharing the joy of giving the cards.

Today to celebrate we have a Blog Hop with lots of Demonstrators from around the world.  The theme today is sharing a corner of your world.

For me,  I live on the East coast of Australia just south of Sydney.  I live about 200 metres (1/4 mile) from the beach. I spend a lot of my time at the beach all year around.  It’s my happy place, my place to escape and leave the worries of the day behind.

This is my local beach.  We have so many beaches up and down the coast though which I do visit too.

So of course since the beach is a big part of my life I had to create a card for that.  I chose to use the Seaside Notions stamp set.

I love different folds too so wanted to make something a little different.  This is a type of Easel card.

Front on.

Side view you can see the fold and the flaps.

Don’t forget to decorate the inside.

See it open.

This was a fun card to make.  To save time I won’t share how to make it today.  Come back and visit me again tomorrow and I will give you the details.  Be sure to PIN one of the images to Pinterest so you know how to head back here.

You can now continue on the hop by heading to the link below where it says Click here.

Powered by Linky Tools

Click here to enter your link and view this Linky Tools list…

Happy hopping around the world.

Jenny

If you need to order your supplies to get creating your own projects and you are in Australia, I would love you to shop with me.  Visit -> HERE.

cards, Catalogues, Stampin' Up!, Techniques, Videos

BUTTERFLY WATERCOLOUR WASH + VIDEO!

Today’s card uses a fun watercolouring technique.  I call it a watercolour wash.  It’s a great way of colouring your images freely without worrying about staying in the lines.  That’s so cool if you are not one for neat, “in the lines” colouring.

I have used the stamp set Positive Thoughts for this card.

You can check out the video below to see some tips in creating it.

Positive Thoughts is such a beautiful stamp set.  I particularly love the sentiments in it.

I hope you give this idea a go. Try it with different stamp sets.

Thanks for visiting me,

Jenny

cards, scrapbooking

DESIGNER SERIES PAPER SALE ON FOR OCTOBER!

Starting today select Designer Series Paper is 15% off.  So many to pick from.

What would be your pick??

If the prices are hard to see all of them are $17 except for the In Good Taste Designer Series Paper stack which is $31.45

Check them all out closer in my store -> HERE.

In Australia?  I would love you to shop with me.

October Host Code: 9J63PU4C

Every $100 order receives a token in my VIS (Very Important Stamper) Club. Collect 10 and receive $50 of free products.

Happy Paper Shopping,

Jenny

Stampin' Up!, Videos

LAST DAYS FOR GET & GO BONUSES!

Time is running out to grab that Get & Go extra value.  I don’t want you to miss out.

This ends on Wednesday. It really is awesome!  

When you join the Stampin’ Up! family in September you will get so much more value! All with the GET & GO. And seriously, you are not committed to life. 

In the Get & Go, you will receive 2 stamp sets – the Queen Anne’s Lace and the So Much Love stamp set valued at $65 for the two.

QUEEN ANNE'S LACE PHOTOPOLYMER STAMP SET (ENGLISH)   SO MUCH LOVE CLING STAMP SET (ENGLISH)

You will also receive a pack of Rhinestones AND card kits to create 16 cards. 

While joining Stampin’ Up! for the extra bonuses with Get & Go is awesome, I think that the best part is – getting a discount on all your quality, co-ordinated Stampin’ Up! Supplies.  Ok, so that’s as well as seeing the products early and being part of an amazing company that looks out for others.

Many on my team love that they can get their minimum discount for themselves. And they are mostly not out there having classes and feeling they have to “sell”.  They just know they are getting value for their money.

Do you have questions, concerns?

I know you may be a bit worried about “committing” to such a thing. I put together a quick video to answer some of those questions.  Watch it on Youtube now -> HERE.

So what do you do need to do!??

Pay $169, Get $235 of products of your choice. (Pay no shipping on this order either). You are well on your way then to stamp and share – and get your minimum 20% discount with every order later.

Ask me for more information or go and check “9 reasons why you would want to join” on my blog -> HERE

Ready to join right now?

Get your list of $235 of products ready and head straight to my website -> HERE It won’t take very long.

I look forward to welcoming you to my JEN’s INK team. I support you in whatever way you like.

Jenny

cards, Catalogues, Christmas, Stampin' Up!, Sunday Suites

SUNDAY SUITES – TRIMMING THE TOWN SUITE!

I wanted to look closely at this cute suite today for Sunday Suites.  It is the Trimming the Town Suite.  It is a collection of sweet, whimsical images whether it is from the Coming Home bundle with the cute house shape diecuts or to the the Trimming The  Town Designer Series Paper.

The Trimming the Town Suite Collection includes

* Coming Home Photopolymer Stamp Set
* Home Together Dies
* Trimming the Town Designer Series Paper
* All the Trimmings Embellishments
* All the Trimmings Ribbon Combo Pack

The product colours in this suite are Early Espresso, Misty Moonlight, Old Olive, Pool Party, Poppy Parade, Whisper White.

The Coming Home Bundle is a fun one.  Don’t just think of this for Christmas though.  What about New House Cards, Welcome to the Neighbourhood and how about the cool VW car. How many occasions could you use that for?? This is a great versatile set.

I have seen some great projects recently with those little house dies.  The ones with the star and the heart.  See the chocolate treat holders below.

Something I think is really wonderful is that with any purchase of the Coming Home Stamp Set, Stampin’ Up! will make a donation to charities devoted to adoption, foster care, and infertility.  That is so good.  So do get behind this great cause.  I will add the ordering details below.

Also in the suite is the Trimming the Town Designer Series Paper.

This paper has cozy villages and winter scenes on one side and patterns on the other side.

Check  out  some  of the Stampin’ Up! samples using this suite.

Let’s have a closer look at some of them.


The Trimming The Town Suite is now available to order in my store -> HERE.

Don’t forget that by purchasing this stamp set a donation will be made to charities with adoption, foster card and infertility.  So you are helping a great cause.

Happy Sunday,

Jenny