I made this card a few months ago and I forgot to show you. This was the first card I made with this Animal Outingset way back then. I have to say I wasn’t overly wrapped in the card. Maybe that’s why I filed it away in the “forget about it” box. 🙂 Anyway, maybe you like it – and not all our cards can be super-wonderful. Not that I think many of my cards are super-wonderful. 😉
So here we are. I call it my Giraffe parade.
I stamped 3 of the giraffes from Animal Outing across a piece of white card and coloured them with the Stampin’ Blends. I outlined the giraffes with the grey Blend. It helps them stand out. After that I wasn’t sure what to do with it. I embossed a piece of Silver Foil Sheet with the Hexagons Embossing Folder. To assemble it I adhered a strip of the Pumpkin Pie card under the foil and matted the Giraffes on some Pumpkin Pie card. The sentiment was stamped on a Thick Whisper card base and then Rhinestones were added to finish.
I just received the Kraft Pillow Boxesrecently. These are lovely little boxes for little treats. I will do that with them soon but I had different ideas for this little project.
I made a little pocket with a matching note card and envelope using the Narrow Note Cards and Envelopes.
This is a great size to give a little note to someone as a pick-me-up or a Thanks. Add a chocolate treat or even a Gift Card.
To make these little pockets, simply cut the top off the Pillow Box just under the curved score line. Then assemble the Pillow Box. Decorate it as you like after it is assembled.
To decorate mine, I added a wide strip of the Share What You Love Specialty Designer Series Paper and then a narrower strip over the top. I wrapped around some Rich Razzleberry Velvet Ribbon and adhered a bow with a Glue Dot. The sentiment from the Love What You Do stamp set was stamped in Rich Razzleberry and then I cut around the ‘friend’ word with scissors. That was raised up with Dimensionals.
The Narrow Note Card was stamped with the flowers in Memento Black and then “filled” with one of the small “dot” type stamps in Rich Razzleberry. I added some Old Olive leaves. Of course, finished off with a Linen Thread bow and a Pearl from the Adhesive Artisan Pearls. The envelope was stamped with a matching flower.
These are so quick to make. I think I need to make some more so I can have some on hand to give out. How will you decorate yours?
I just discovered a fun new technique and I thought I would share it with you for this Wednesday’s WOW!Can you believe we are up to #36?? There are so many exciting techniques and projects to share with you each week.
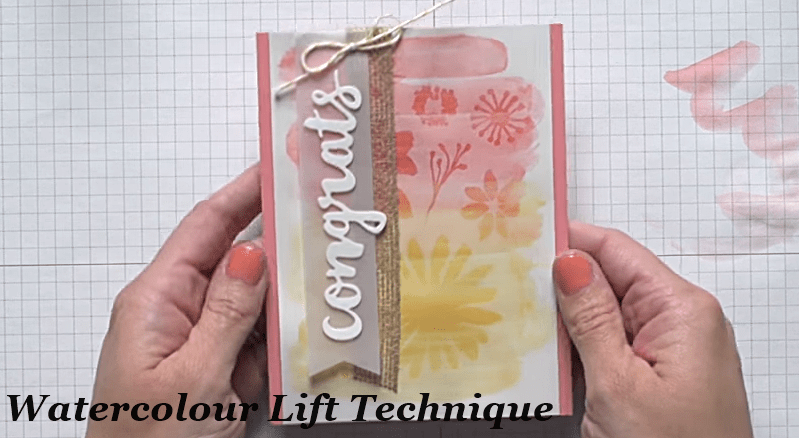
This week I wanted to share with you the Watercolour Lift Technique.
Here is a card from Stampin’ Up! to show you the technique. How pretty is it?
Basically, it is washing your Shimmer Whitecardstock with a wash of ink using the Aquapainter. Let it dry. Then stamp your images in Versamark over the area. Solid images work better. Then clear emboss them. After that, wash over the card with a clean Aquapainter to lift some of the ink. It lightens it revealing the images. How cool!
I have a video to show you how it is done.
What do you think? Now I am going to have to go off and try this ASAP. Share your samples with me too I would love to see them.
Thanks for visiting me today for another episode of Wednesday’s WOW!
A couple of weeks ago when I was creating a card for a Blog Hop I was in I created this card. I wasn’t happy with it for the Blog Hop but I thought I would share it with you now. It is not my usual style so I didn’t feel comfortable with it. 🙂
At the time the theme of the Blog Hop was to be using a product from the current Catalogue. If you go back a few posts (or head -> HERE) you can see what I ended up with.
I was having trouble working out what to make for it initially so I thought I would CASE a card from the catalogue. The card on page 99 of the catalogue caught my eye so I thought I would use that as inspiration.
This was the inspiration card.
Details for my card I created up above.
The Designer Series Paper strip is from Share What You Love Specialty Designer Series Paper. The Razzleberry Strip is embossed with the Softly Falling Embossing Folder.
The tag and the background was stamped with the Timeless Textures stamp set. I sponged around the edge with White Craft Ink and distressed the edges. The little sprigs were diecut from the Botanical Tags Thinlits cut from Mossy Meadow card. The circle is stamped with images from the Botanical Bliss stamp set. I swirled around a couple of loops of Linen Thread behind the circle.
So certainly different. Whether you like it or not just remember that the catalogue can be a great source of inspiration to create your next card.
By now you would have seen quite a bit of the Blended Seasons Bundle around different blogs and Pinterest. It is a beautiful bundle. I am just sad that it is only around for this month. It is so versatile. So today for Wednesday’s WOW! #35 I thought we would take a closer look at it.
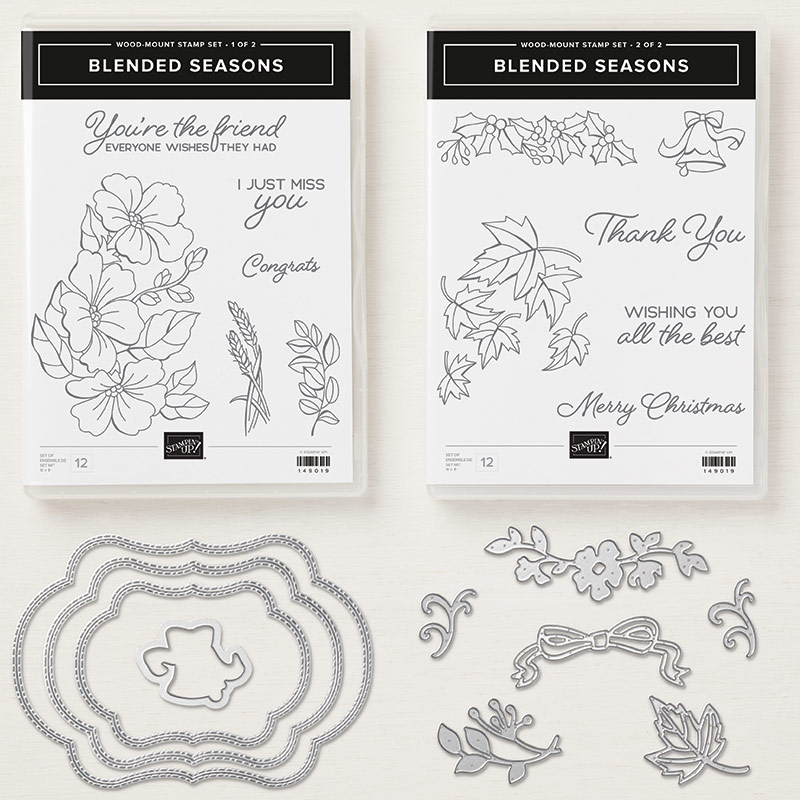
Here is the Blended Seasons stamp set and the matching Stitched Seasons Framelits.
How many different occasions can you see using this set for?
Birthday – The sentiments are fitting for a birthday. The flowers come up beautifully coloured with whatever your choice of medium whether it is Watercolor Pencils, Stampin’ Blends or Inkpads and Aquapainter. You could also use the ‘husk’ type image or the leaves for a great male card.
Congratulations/All the Best– Try colouring the flowers for this occasion too. The leaves are great as well.
Wedding – Those sweet bells are not just good for Christmas but they make a lovely wedding card.
Thinking of You – Add flowers, leaves or the husks and with those sentiments you have a lovely card to let someone know you are thinking of them.
Christmas– There are lots of stamps to use for this occasion, the bells or that gorgeous holly. I love the font in this set.
Teamed with the Framelits they make cards for every occasion. It is such a versatile set.
Speaking of those Framelits though. Did you realise they are double stitched? They have a stitched line effect on the outside edge and the inside edge of the diecut. It looks really cool. With 3 different sizes you can layer them together.
Below is a videofrom Shannon West at Stampin’ Up! to show how these stamps and dies can work together but it especially has some great tips on watercolouring, so be sure to check it out. If you are viewing this from an email update and the video is not showing be sure to click on the blog link above to go directly to my blog to view it. 🙂
Here are some ideas courtesy of Stampin’ Up! Some of the cards are the ones featured in the video.
I think this one below is one of my favourites I have seen with this bundle. It shows how the Framelits work with the stitching and I love the colours used.
Lots of great ideas for you.
If you are after some more inspiration you can head to my Pinterest board ->HEREand check them out.
Grab your Blended Seasons Bundle in my store now ->HERE. Don’t delay as it is only available for this month but only while supplies last. If you are ordering online please use the Host Code: WRQSC9N3
I had a little time yesterday to play along with the Colour Inkspirations Challenge for this week.
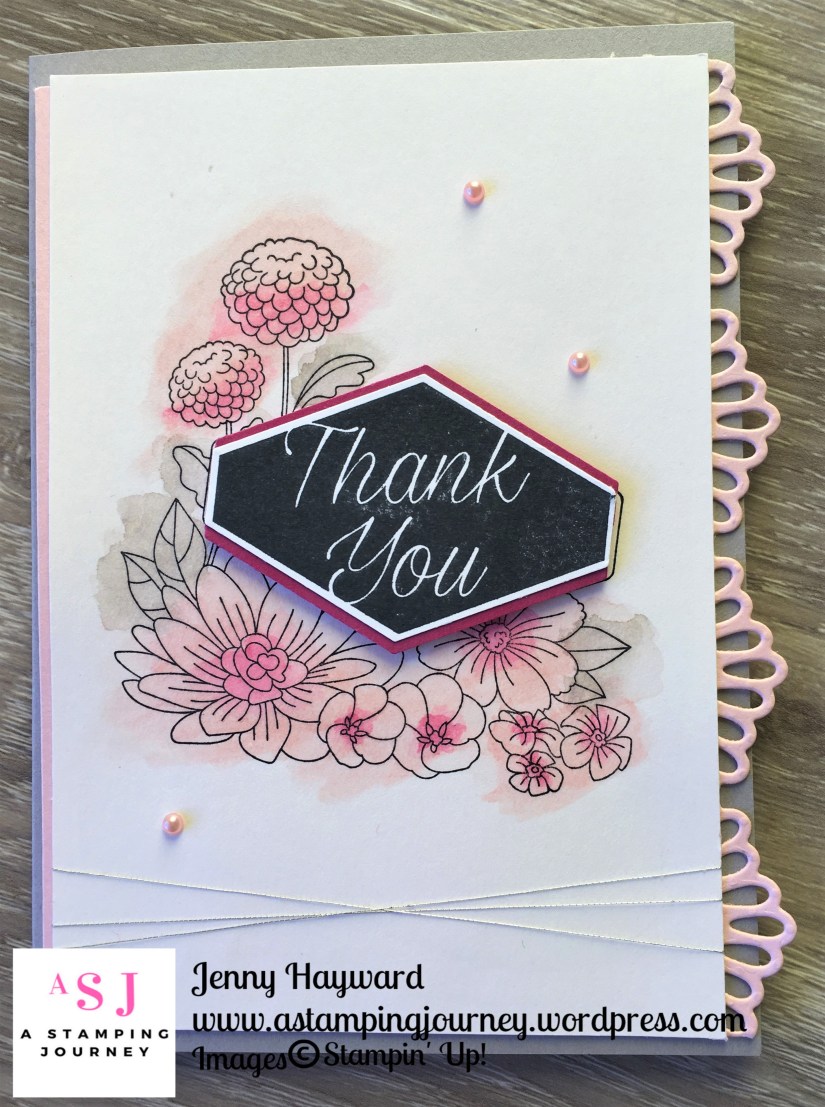
#CI38 colours were Powder Pink, Berry Burst, Gray Granite, Whisper White and Basic Black.
I had been using the Accented Bloomsstamp set the last few days, which I will show you those cards later on. Since that set was out I thought I would use that. I think the soft muted colours would work well with a little watercolouring on flowers.
Here is my card.
I came to the conclusion this week that I am not a fan of colouring. So to colour this for the challenge was a little surprise. But I think a little freestyle watercolouring can work well. It doesn’t matter if you go out of the lines. 🙂
I used the Aquapainter and Inkpads to watercolour this. TIP:To watercolour any image I suggest several washes of colour if you want to build up the colour. Then allowing it to dry in between. For this card I lightly washed sections with the Powder Pink and then allowed it to dry. It only takes a few minutes. Wash over the areas with the Gray Granite. Then wash over again in the areas with the Powder Pink. I did that 3 times with the Powder Pink as it is such a pale colour. When it was all dry I washed over the centres of the flowers with the Berry Burst ink. I allowed it to dry before washing again with the Berry Burst. It is a time consuming process but I think worth it.
The lovely delicate edge is cut from the Delicate Lace Edgelits.
The sentiment is stamped in Black and punched with the Tailor Tag Punch. I punched another piece from Berry Burst card. Cut that piece in half horizontally then could layer it underneath the stamped piece so you see the little pink edge peeking out. I finished with some Artisan Pearls and some Silver Thread wrapped around a few times.
Now to get this in to the Facebook group before the time is up tonight. You can head over to the group -> HERE and join in on the challenges. It’s a great way to extend your creativity.
I am taking part in a Blog Hop today with the Facebook group – The Joy Of Sets.
You might have just come from Kirsten’s blog. (click on the arrow below to go back if you missed it or you will get there after going around the hop).
Today’s theme is a project using any product from the current 2018 Stampin’ Up! Catalogue.
Focusing on ANY product from this current catalogue is pretty overwhelming really. There are so many wonderful products. What do you choose!! After trying a few options I chose the Sitting Pretty Bundle. I made a card set in some fun bright colours.
I used the Brights Paper stack and the co-ordinating Glitter Enamel Dotsin Gorgeous Grape, Granny Apple Green, Coastal Cabana and Melon Mambo.
The lovely ornate seat is heat embossed in Copper and then cut with the Pretty Park Framelits.I added a vellum scallop circle under the seats and cut a small heart that is in the Framelits set in the matching colour. The sentiments and the fun swirl is from the Happy Birthday Gorgeous set.
Here is a close-up of the Gorgeous Grape one so you can see it more clearer. They are all the same layout.
Now you can continue the Blog Hop and see all the other creations. Head to Susan’s Blog by clicking on the arrow below.
OK, Today is my last sharing from our recent Team stamp day with Shoebox Swap cards. I have a few various ones for you.
This one below is using that gorgeous Delightfully Detailed Laser Cut paper. I have shown lots of cards using this paper recently. For this card you don’t need much more than backing a section of the paper on to a strip of black card and adhering it to your white base card. It makes it look so elegant don’t you think?? I think from memory the sentiment banner is a strip of white card and using the small circle punch to notch out each corner.
This next one is a fun fold. Adhere a strip of the lovely paper, this one is the Nature’s Poem DSP, down the left hand side of the front of your card. Punch a slit using the Classic Label Punch on the side of the card front. You need to punch it twice to be sure that the dragonfly fits through. Punch it once near the top, then slide it down a little bit and line it up with the previous punch and punch it again. A dragonfly from the Detailed Dragonfly Thinlitswas cut from Vellum and also from Cajun Craze.
This is the inside of the card. The sentiments are from Better Together set. It’s a cool card.
This card uses the lovely Love What You Do set, the Share What You Love paper and the Lovely Floral Embossing Folder.
This is a cute little treat bag below. It is very quick to make up. This is based on Pootles bag -> HERE.
I hope you have so enjoyed these little projects from our team day. We are getting ready for another get together in the next few weeks. Hopefully I don’t take as long to share those with you. 😉
Some more cards today from our Team Shoebox Swap. Really we have some amazing talent in our Inky Fingers Team.
Today I will share the cards using the Rooted in Nature Bundle.
This one below is using a number of different patterns from the Nature’s Poem Designer Series Paper. I like how the words are cut apart.
This one below is just gorgeous. A white card mat is embossed with the Pinewood Planks Embossing Folder. I hadn’t seen this folder used before. I like it. You should see those leaves in real life. They are heat embossed in Copper on to Vellum. So nice. The other leaves are embossed with one of the leaf embossed dies in the Nature’s Roots Framelitsset. The sentiment is heat embossed in copper too. This is such a striking card.
I hope you like these ones. Yes still more to come. It was a busy day at our team meeting. 🙂
I have another group of photos to share with you today from out Team Stamp day a couple of months ago. We all created a card in the Shoebox Swap for each person to create. I showed you some lovely ones yesterday. (Head back to the last post if you missed it).
This is a mix of different cards.
I haven’t used Sheltering Treeset in a while. After stamping the tree on the white Diecut oval, then stamp the small “dots” in the set in different colours over the branches. We used Tranquil Tide, Pineapple Punch (I think), Grapefruit Grove, and Lovely Lipstick. There was a purple colour created but that was from mixing the Lovely Lipstick and the Tranquil Tide I think. The white card piece was backed on to a diecut black oval that was cut in half.
The next one below uses the High Tideset and the cool seat from Seasonal Layers Thinlits. The sentiment is from Colorful Seasons. To create the background on the card, ink the clear block in the Pool Party inkpad. Lightly spritz it with water and stamp on to the Shimmery White cardstock. The reeds are stamped in Soft Suede and then stamped off again on the card to make it lighter. This was repeated a couple of times.
This next one is using the Coffee Cafestamp set and the Coffee Cups Framelits. The card was distressed a little with some sponging with Soft Suede ink. This was a fun card to create.