3D projects, Blog Hops, Catalogues

EASTER TREAT BAG FOR STAMPIN’ DREAMS BLOG HOP!

This month’s Theme for the Stampin’ Dreams Blog Hop is … Easter.  You might have just come from Angela’s Blog -> HERE or starting at my blog here either way enjoy the hop.

Easter time is fast approaching!  I have an Easter Treat Bag to share with you.

THE TREAT BAG

I have made the treat bag using the Mini Treat Bag Thinlits set from Thick Whisper White card.  It would be more sturdier than regular white card.  You want it strong to hold that chocolate  in. 🙂  There are a couple of modifications to the bag to make it wider to hold the chocolate bar.  I will outline these changes below for you.

Cut your Treat Bag out with the Thinlits from cardstock.  Emboss the card pieces with the Basket Weave Embossing Folder.  Adhere the 2 pieces of the diecut bag together as you would usually to have one long card piece. Don’t adhere together to form the bag as yet.

Due to the thickness of the chocolate bar you will need to add an additional piece to your bottom tab. Cut a strip of white card measuring 9cm x 3cm.  Score on the short side at 1.5cm (3 1/2″ x 1 1/8″ scored at approximately 1/2″). This piece will be adhered to the bottom of the treat bag to enable the bottom to be sealed.  To do this, add adhesive along one side of the small scored strip.  Adhere this to  the bottom tab section.  Place adhesive on the back tab and fold over to adhere.  NOTE:  Place your chocolate or other treat in before doing this and wrap it around the treat so it is folded at the right place to fit.  Also, it won’t adhere completely the full length due to the size but will adhere at the top points.

DECORATING THE BAG

To decorate the front of the bag I wanted to keep it simple.  I had just received the You’re Inspiring set so thought it would be just appropriate for Easter.  Although Easter does not exactly fall in our Spring time when the Daffodils appear but it is still nice and sunny and warm and I think these daffodils are quite bright and cheery.  I coloured the daffodils with the Stampin’ Blends.

Once the daffodils were coloured it was then cut with the largest circle from the Layering Circle Framelits.  The paper for the banner is from the Color Theory Designer Series Paper Stack.  I flagged the end of the strip and raised that up off the front with Dimensionals.   At the top of the banner piece I added a Gold Binder Clip and tied around some White Organza Ribbon. Adhere your stamped circle off the paper with Dimensionals.  Stamp the sentiment from the Inspiring You set on Pumpkin Pie and punch out with the Duet Banner Punch.  

——-

Thanks for visiting. Now hippity-hoppity to the next blog to see what Easter creativeness beholds.  You will be off to Kim’s blog ->  HERE (click on this to head to it as I have a WordPress blog I can’t add the link within the ‘NEXT’ below). 🙂

Jenny


Catalogues, Sale-A-Bration

SELECT CATALOGUE PRODUCTS NOW AVAILABLE AS SALE-A-BRATION CHOICES!

As if Sale-A-Bration isn’t exciting enough but Stampin’ Up! keep on giving!  Just announced: Stampin’ Up! have released some new choices for Sale-A-Bration AND they are catalogue products.  Check them out.

As already for Sale-A-Bration there are 2 levels of products.  Level 1 is for orders from $90 (green circle choices).  Level 2 are orders from $180 (orange circle choices).  I know the products aren’t too clear in this image but you can see them in the catalogue.

So have you stocked up on your cardstock and ink?  What about the reinkers for the retiring incolors?  Throw in some adhesive and you are at least at $90 before you get to stamps and dies.  As a bonus you choose something for Free!

In Australia?  Head to my store -> HERE now.  Go shopping and then choose your Sale-A-Bration item.  If you want to choose one of the above items you will need to use the item numbers on the image above.  As they are a little hard to see, drop me a message or comment to ask me.

If shopping online Please use the HOST CODE:   UUDCYQDV 

OR

You can contact me directly to place your order.

Thanks for shopping with me,

Jenny

cards, Catalogues, Personal Ramblings

LAKE SCENE WITH THE WATERFRONT SET!

OK.  I have another Waterfront card for you.  Are you sick of seeing these cards yet? Sorry about that.  Tomorrow is the last one for a while.

Today though I have a Lake scene stamped with this stamp set.  It might be your typical scene with it.  I was trying to recreate this scene from one of my favourite places in the world – Cradle Mountain in Tasmania, Australia.  It didn’t quite look as I wanted to but I like the card anyway.

This is the scene and then I will show you my card.  You be the judge. 🙂  I made this early on in my playing with this set so I was still getting a feel for it.


I climbed to the top of that mountain peak in the distance last year.  It was a HUGE effort.  It had been a goal of mine for maybe 18 years.  It holds a special place in my heart.

The trees are a little larger in the forefront but I had to work with what I had. I can see a few changes that I would make now. It doesn’t matter.  It doesn’t have to be exact.  The landscape images are just to inspire us.  Maybe I will have another go at it.

Thanks for your patience this week while sharing these projects.  Last one for the week tomorrow.

Have a great day,

Jenny 

*** You still have time to order the Waterfront stamp set this week either online or directly to me. Receive 4 x A4 sheets of Shimmery White cardstock PLUS a tutorial for an exclusive project.  

You can order online in my store -> HERE.  Please use the Host Code this week: SBZEJCNH    Thank  You.  🙂

cards, Classes, Stampin' Up!

IT’S A WATERFRONT WEEK!

All this coming week I have some fun projects for you using the Waterfront stamp set.  I have been playing with this set this past week and there is more to this set than you might think. I hope you will join me this week as I share projects and tips to create with this set.  I can’t wait to share them with you.

It all culminates next weekend with my WATERFRONT WOW! class in the studio for my local peeps where we will be creating some special projects in class.

So be sure to stop on by this blog.  If you haven’t subscribed already be sure to click in the tab in the right hand column so you don’t miss out.

———–

For my Local people.  Here are the details for the WATERFRONT WOW! Class.  Be sure to book early as places are limited on this one.

WHEN: Friday 9th March at 10am OR Saturday 10th March at 2pm.

WHERE: In my studio in East Corrimal (Wollongong).

COST:  $20  BYO: Scissors and adhesives.  $5 extra to use my adhesives.

Here is a sneak of the projects we will be making.


***Order the Waterfront stamp set this week either online or directly to me and receive 4 x A4 sheets of Shimmery White cardstock PLUS a tutorial for an exclusive project.  

You can order online in my store -> HERE.  Please use the Host Code this week: SBZEJCNH

Thanks so much

Jenny


3D projects, Blog Hops, Catalogues, Stampin' Up!, Tutorials

ESAD BLOGHOP SALE-A-BRATION 2018!

Today I am joining in on a Bloghop with lots of other demonstrators in Australia and New Zealand in the ESAD Facebook group.  (ie Extra Special Australian and New Zealand Demonstrators.  We are all special though!).  We are focusing on Sale-A-Bration.  You might be starting here or might have come from Melinda’s blog -> HERE.  Either way, enjoy the fabulous creations along the way. 

Firstly, what is ESAD.  Let’s get that out of the way.

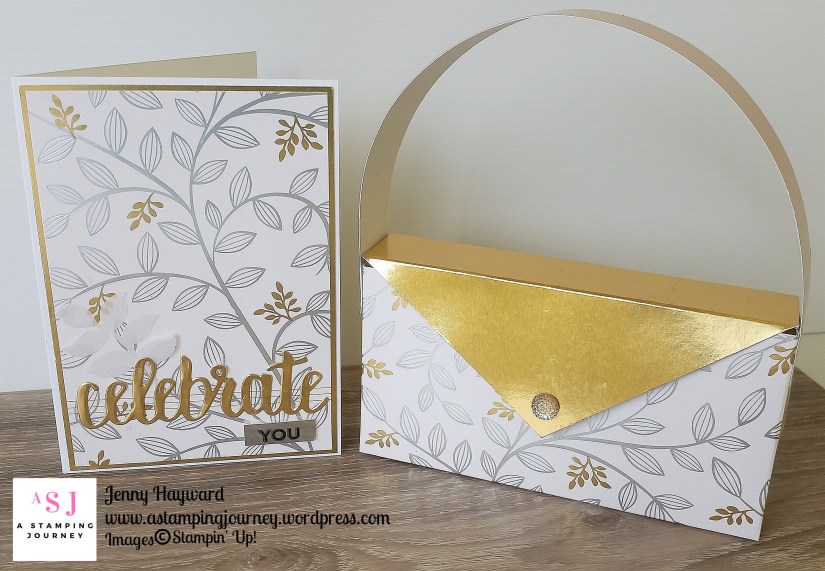
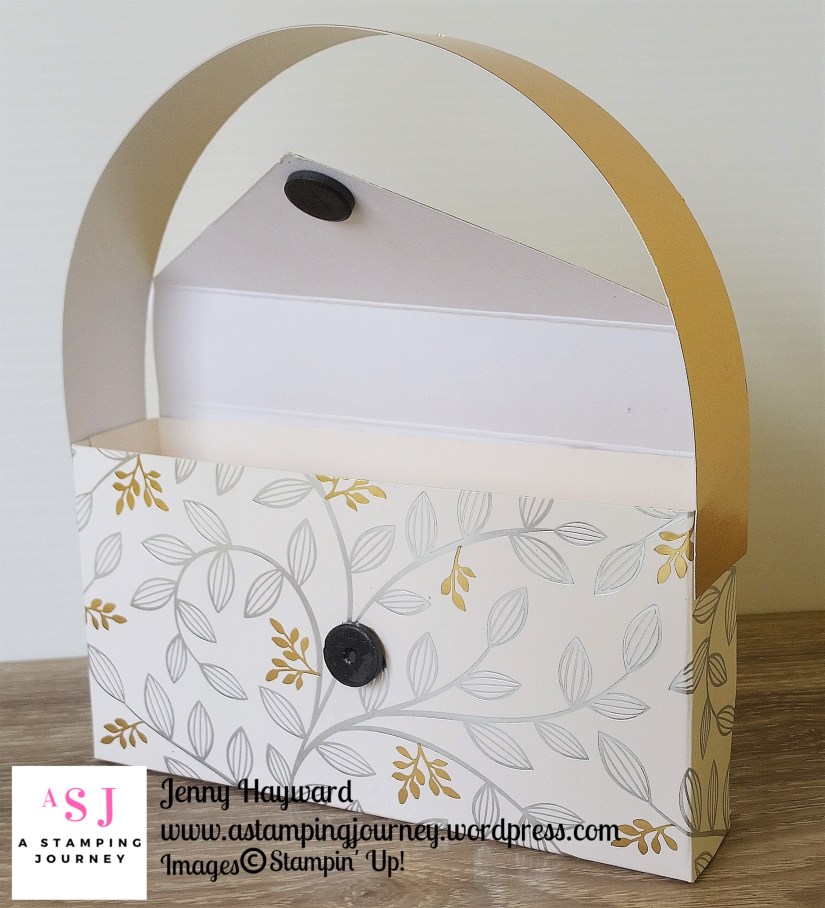
I am loving the gorgeous new Springtime Foils Specialty Designer Series Paper that has just become available for the second release for Sale-A-Bration last week. You have already heard me go on about it.  🙂  Anyway, I thought a CLASSY CLUTCH BAG AND CARD was in order with this gorgeous paper!!

What special gifts you could fill in this clutch bag. It’s a good size for chocolates, a small gift, makeup???? So many different gifts for a very special occasion.  I will show you how to make the clutch bag further below.

———–

Firstly, the card.

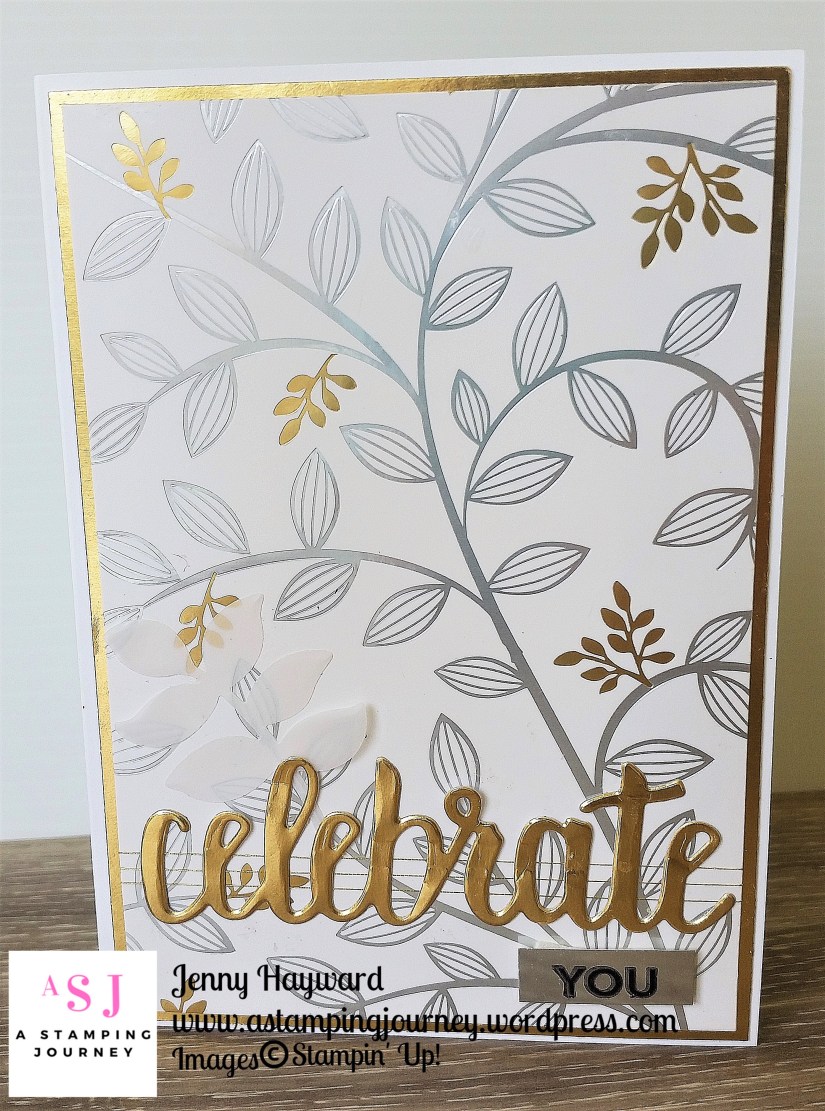
Really, you don’t need to do too much when you add this gorgeous paper to a card.

Firstly I wrapped some Gold Thread several times around the bottom section of the paper.  Then adhered this piece to a Gold Foil mat and then adhered them both to a Thick Whisper White card base.  The “celebrate” is cut from the Celebrate You Thinlits from Gold Foil.  Another bonus choice for Sale-A-Bration.  It is hard to tell but I stamped the “YOU” on to a small piece of Silver Foil in Black Stazon.  I also added a small Vellum leaf under the “celebrate”.  This is from the Eclectic Layers Thinlits set.

MAKE A CLUTCH BAG FOR A SPECIAL GIFT

I originally made this bag back in 2010.   You can see that version -> HERE.  I have been wanting to create it again for some time so this was a great opportunity.

This is the front view.

And we have the side view.

To make your clutch.

NB: Measurements are in Metric and Imperial. (please check the Imperial measurements in scrap card to check. It’s always a good idea to test run your projects beforehand anyway).

1. Cut a piece of the Springtime Foils Specialty Designer Series Paper (or other card of choice) to 19cm x 20cm (7 1/2″ x 7 7/8″).  NB: Check the pattern of your piece is running the way you want it to.  The 20cm side (7 7/8″) is the front/back.

Score on the 19cm (7 1/2″) side at 8cm and 11cm (3 3/8″ and 4 5/16″).

Score on the 20cm (7 7/8″) at 2.5cm and 17.5cm (1″ and 6 7/8″).

2. Cut up the tabs on the side to meet the score line.  Fold on the score lines. Fold up to form a box and then you can see where to place your adhesive.

Add adhesive to your tabs.  Fold up and adhere together in the box shape.

3.  Create your handle. Cut a strip of the Gold foil for your measuring 3cm x 30.5cm (approximately 1 1/4″ x 12″).  TIP:  I ran this piece along the edge of the table a few times to help curl the card strip.  Place adhesive on the ends of the strip and adhered this to the sides of the box.

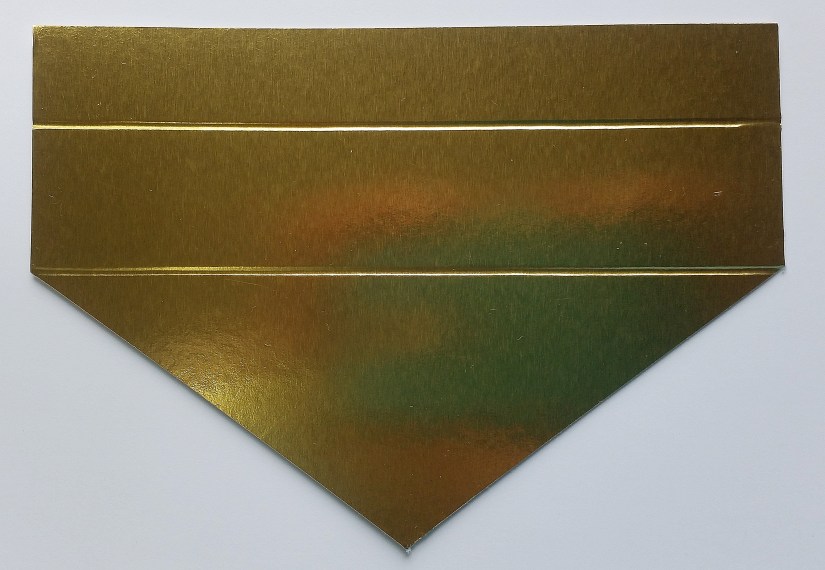
4. Create your flap for you bag.  From Gold Foil cut your piece 15cm x 10.5cm (6″ x 4 1/8″).  Score on the 10.5cm side (4 1/8″ side) at 5.5cm and 8.5cm (2 3/16″ and 3 3/8″).  Cut the front flap to a triangle if you like.  To do this mark the edge of the Foil piece at 7.5cm (3″) which is the mid-point.  Then cut from the point to the side of the card where the score line meets on both sides.  See the photo to show how it would look. 

5. Place adhesive on the inside edge of the narrow tab. Adhere this to the back of the bag.

6.  I used magnets to hold the bag closed.  Place a magnet on the underside of the front flap.  Then line it up and place a magnet on the front.  I would have preferred to have the magnet inside the bag and I tried several times but the magnets weren’t strong enough for the card thickness.  Maybe your magnets would be better. 🙂

I hope you like this project.  I can imagine it in so many different papers but this paper is just so gorgeous.

Thanks for hopping.


 Now you are off to Lou’s blog -> HERE.


Here is a list of participants if you get lost.

Blog Hop Participant List

  1. Lou Kitzelman
  2. Sandra Mastello
  3. Courtenay Heuston
  4. Ellen Woodbridge
  5. Cheryl Algie
  6. Peta Stephen
  7. Nicole Wilson
  8. Maree McIntosh
  9. Kristel Rimmer
  10. Libby Dyson
  11. Leonie Schroder
  12. Jessie Holton
  13. Megan Lenske
  14. Delys Cram
  15. Rachael Lewsley
  16. Kim Oliver
  17. Sharon Dalton
  18. Melinda Whittington
  19. Jenny Hayward


cards, Sale-A-Bration

MINI LOTS OF LAVENDER THANKS!

I thought I would show you the mini Thank you cards I made for my customers last month using the Lots of Lavender set available for Sale-A-Bration.

I have to say, in my hurry to get them out I missed stamping the “thanks” on the front.  Silly me! 🙂 I had the stamp set on my desk too.  Never mind!  I wrote inside to say Thanks to them and that I appreciate their order.  I like to send little notes like these often.  They don’t need to be big standard size cards.  For these I used the Narrow Note Cards and Envelopes in the Occasions Catalogue.

The Lots Of Lavender set is a great 2 step stamp set.  Some of the time (well most of the time) I don’t feel like colouring, so you can stamp the outline and then fill in the image with another stamp.  I used 2 colour variations.  One on the left – Powder Pink and Berry Burst.  On the right (Wisteria Wonder and Elegant Eggplant).  The leaves were stamped in Wild Wasabi.  I went over the lines of the leaves with the Wild Wasabi marker.  The stems were coloured with the Old Olive marker.  I added a little bow with the Linen Thread and attached it with a Glue Dot.

This is the Lots of Lavender set if you hadn’t noticed it in the Occasions Catalogue.  It’s great for quick cards.  This set is one of the free choices available for Sale-A-Bration with orders over $90.  

Thanks for visiting my little corner of Blogland.  I do appreciate each one of you.  I wish I could send a Thank You card to each and everyone of you. xx

Jenny


You can order online now -> HERE and grab your Lots of Lavender set (or one of the other free choices) OR contact me directly.

3D projects, Catalogues, Stampin' Up!, Tutorials, Videos

THERE IS “LOTS TO LOVE” ON VALENTINE’S DAY!

I showed you in yesterday’s post the cute Flip Top Treat Box using the Lots To Love Box Framelits.  Here it is if you missed it but you can jump back to the last post though too and see more of it and the instructions.


This is actually a cute little Framelit set but there were parts that I wasn’t sure what they were used for.  Like those little tiny arch shaped dies down at the bottom of the image below???

I found this video from Stampin’ Up! explaining the pieces and showing some great projects.  I thought for my Wednesday WOW! #14 this week we will take a look at this set.  Very timely today being Valentine’s Day right. ❤  It does work well with the matching Sure Do Love You stamp set too.

That explains everything!

You can grab the Framelits in my store now -> HERE $57 AUS or grab the bundle and use them together.  Clear mount stamp set is $84.50 AUS  See that -> HERE.

Aren’t these projects pretty? These are from the current Occasions Catalogue and shows how gorgeous the products are especially with the beautiful Painted with Love Specialty Designer Series paper. SO much prettiness!

Thanks for visiting me today.  Always nice of you to drop by whether you are from near or far.  I hope your day has been a great one.

Until next time.

Jenny x


cards, Techniques, Tutorials, Videos

IT’S A BRUSHO CRYSTALS LONG WEEKEND – DAY 1!

We start today! I am excited to bring these projects to you for our Brusho Long Weekend.  I have been playing with these Brushos (as I commonly call them) for the past few weeks.   Each day over the next 3 days I will bring you a fun new project with a video and tips.  I hope you enjoy them.  Plus don’t miss out on the Special bonus savings this weekend if you are an Australian resident.

Warning: These Brushos are fun, addictive and at times messy.  🙂

DAY 1

My first project is creating a simple background similar to this one I have shown on this Dragonfly card.

Here is a video to create a washed out effect but I have also written a description below with a few tips.

NB. The above card was made a few weeks ago as I was still experimenting.  For the card above I used watercolour card and sprinkled over the powder with the card dry and then wet it. It does give a slightly different effect.  On watercolour card the colour doesn’t run as well. You can create a background like this or how I have in the video.

In the video: I chose to use Gloss card and wet the card with the Aquapainter before I added the Brusho Crystals as the water enables the Crystals to spread easier.

Sprinkle over some Brusho Crystals lightly on your card after you have wet the card.  I have used the Prussian Blue.  You only need a small amount and for this technique I would keep it to one colour.

Spritz the card with water. Tilting the card will help make the colour run. Spritz lightly with more water if you think it needs more or you can sprinkle over more colour if need be.   When you are happy with the effect, leave the card aside to dry.  Once dry you can assemble the card.

On the card above I stamped the Dapper Denim base with the dots from the Dragonfly Dreams set.  A dragonfly was cut from the Detailed Dragonfly Thinlits in Gold Foil. I stamped a few of the dots from Timeless Textures in Versamark on my coloured card piece and heat embossed them in gold.  The paper is from the Eastern Palace Specialty Designer Series Paper.

Just a note on the sentiment: I masked part of the sentiment from the Dragonfly Dreams set and inked it with versamark.  After I stamped it on the Dapper Denim card I heat embossed it in gold.  It was cut with the smallest framelits in the Lots of Labels Framelits.  I added a few loops of the Gold Thread behind the sentiment.

I hope you like this project. Each time you do it the effect will be different.

Come back tomorrow for a second project.

Grab 15% off your Brusho Crystals this weekend. (ends Sunday 11th 8pm). Details below.  Includes an information sheet on ways to use your Brusho Crystal Colours.


cards, Catalogues, Sale-A-Bration, Stampin' Up!, Videos

WEDNESDAY’S WOW! #13 – HEARTFELT BLOOMS!

Watch It Wednesday’s and Wednesday’s WOW! are back for 2018.  I have decided to combine them both in to Wednesday’s WOW! Each Wednesday I will bring you a stamping WOW! It might be a video, a tip, a product that has caught my attention or a special project.  I hope you enjoy these episodes.  You never know what I might uncover.

Today we have Wednesday WOW! #13. 

Do you find sometimes you go through a catalogue and see a stamp or maybe a die set and think Mmm? Maybe? But it doesn’t really do it for you.  I found that with the Sale-A-Bration set Heartfelt Blooms.  Another flower set and the flowers weren’t all that exciting.  What do you do with a stamp like that??? 

Well! I have been watching this little sleeper over the last few weeks and I have to say I am quite surprised with what this stamp can do.  Firstly, this stamp is a different type of stamp.  It is a “distinktive” stamp.  Meaning that the stamp lays down the ink at different opacities.  So you get different depths of colour.  It gives a Photographic finish.  Clever!

Stampin’ Up! have recently released a Youtube video highlighting this stamp.  I was impressed.  I thought I would share it with you if you hadn’t noticed it.

What do you think of this stamp?  I would love to see some of your cards using this set.  Why not email them to me and I might just share them here. (I might event send out a random prize of some handmade cards).  I have just got this set so I look forward to playing with it.

There are so many different ways that people have used this set.  Some people have coloured it with pencils, or with ink and daubers.  They have cut and layered the flowers.  If you want some inspiration, I have put together a Pinterest Board with this set.  Head on over -> HERE to see them.

Now this stamp is a Free one.  Really! Grab this as one of your Free Sale-A-Bration choices when your order reaches $90 AUS.  Available in Wood and Clear Mount. See it in store now -> HERE.

Have a great day,

Jenny

cards, Personal Ramblings, Stampin' Up!

WHAT IS STAMPIN’ UP! ABOUT THEN??


(If you receive this blog update as an email and you can’t see the image above then please pop over to the actual blog post and check it out).  

I posted the image above on my Facebook Business page last week.  It created a lot of discussion and lots of interesting statements of what people felt Stampin’  Up! is about.  I thought I would share it all here and I would love to hear what you think PLUS I am going to draw someone at random to receive a prize.

Some of the things people on my Facebook page felt Stampin’  Up! was about to them is:

  • Creativity – through stamps, ink, papers, sharing ideas and inspiring each other.
  • Fun.
  • Making a difference in people’s lives.  (Changing lives and enriching lives). This can be through sharing stamping with others and helping them feel excited about it. Also, giving support to them maybe through fundraising or help.
  • Memories – making them during events and get together’s and preserving our memories by scrapbooking them.
  • Relaxing and providing a “time out” for you.
  • Friendships – This was the most popular.  It draws people in to share a common hobby/past-time.  As a result friendships are formed and these can be long-lasting.  For me personally, I have made friends with people from all over the world and I am very thankful for that.  I wouldn’t have “met” them if it wasn’t for Stampin’  Up!


So, can you add anything else?? Why not drop me a comment and tell me your thoughts and what Stampin’  Up! means to you.  Whether you are a Demonstrator or a customer. You might feel the same way as those mentioned above or it might be something else.

BLOG GIVEAWAY

I am going to pick a comment at random to win a Prize  It is the Sale-A-Bration set – Heartfelt Blooms. (This is a gorgeous stamp giving a photographic appearance to the image)

This is only for Australian residents only BUT if you are from outside Australia then I will send you 5 handmade cards.

SO, Tell me:  What is Stampin’ Up! about for you?

—————

If you want to know more about actually being in the Stampin’ Up! family, Sale-A-Bration is a great time to.   You get $230 of Free products!!! Is that something that means a lot to you?

Find out more on my Blog Page ->HERE or drop me a comment or email to find out more.  I have room for you to join with me on my JEN’s INK Team.

Jenny