Catalogues, Stampin' Up!, Weekly Deals

SPECIAL OFFERS FOR THIS WEEK FROM STAMPIN’ UP!

specialoffers_shareable-2_sept2016_eng

Look at this.  It is Wednesday and I am actually telling you about the Special Offers that started TODAY!! From 1-21st Stampin’ Up! are offering 25% off select products.  You have got to love that. 🙂

Here they are for this week (8-15th). Do you fancy some Cake and Sprinkles this week??special-offers-8-15

I like this cute card with the Cupcake Cutouts courtesy of Stampin’ Up!

cupcake-cutouts

TO ORDER

If you like the look of any of these items and you haven’t got a Demonstrator already then stop on by my store HERE to order.  Or you can contact me directly.  (Australian residents only).

Thanks for visiting today.

Jenny

Blog Hops, cards, Stampin' Up!, Techniques

HOLIDAY CATALOGUE BLOGHOP!

International blog hop Sep 1

International blog hop images

I’m excited to be a part of this International Blog Hop as we showcase some exciting new products from the Holiday Catalogue! Are you ready?? It’s just a small one but I think you are going to love these projects.  You might have come from Alexe‘s blog or just starting here.  Don’t worry you can hop anywhere.

For my projects today I am showcasing the Paisleys & Posies stamp set and the Paisley Framelits.  These new products are so fun and cheery.  I reckon anyway.

For my first card I thought I would create my own dry embossed background.  Here is my card and then I will show you how I have created it.

Embossed paisleys

The card is on a Thick Whisper White base.  See the background?  I have embossed the Dapper Denim card using the Paisley Framelits. 

To create the background lay the Framelits pieces on to your card making sure the cutting edge of the Framelits face up NOT DOWN on your card.  Position them as you like.  Here is a photo to show you.

Embossing with the thinlits

Run the piece through your Big Shot on the platform you normally would with the Framelits.  Just double check your Framelits are facing up before you roll it through. (I made a little mistake with this the first time!!).  You will see once you run it through that the pieces will be embossed. You could try this with a number of different Framelits.

Embossed card with paisleys

I didn’t want too much to finish the card off so it didn’t hide the embossed pattern. I just cut some Paisleys from Gold Foil Sheet.  The sentiment from Tin of Cards is Heat Embossed with Gold Embossing Powder and cut with the Tags and Labels Framelits.

I have another card to show you using the Paisleys & Posies stamp set. I called on a technique and colour combination I used a little while back.  It was good to pull this one out again.

Emboss resist Paisleys

This one is the Emboss Resist Technique. If you are not familiar with it, Stamp your images in Versamark on white card and then heat emboss in White Embossing Powder. Sponge over the card using your chosen colours.  I have used Tempting Turquoise, Elegant Eggplant and Bermuda Bay.  Once you have inked the card, rub over the card with a tissue to wipe off the excess ink on the embossed parts and you will see your images “POP” even more.  It’s quite magic.

I finished if off by tying around some Thick White Twine then layering it onto Perfect Plum card mat.  I found that a better match than using the other colours that I sponged with.  It was then layered on to a Thick Whisper White card base. Just a note too: I stamped my sentiment from Tin of Cards onto the card before stamping any of the Paisleys so I knew where to position them.

Hope you like these cards?

Now off to Amberlee’s blog HERE.  Enjoy your little Global trip.  🙂

If you get lost along the way then here are the blogs to visit.  (If the links aren’t working immediately just be patient and come and see again soon. Also you may wish to use Google Translate if you haven’t got a Translate tab on your computer).

Elizabeth Green

Alexe Guillemette

Jenny Hayward – You are here 🙂

Amberlee Batchelor

Jenny

Catalogues, Stampin' Up!

THE HOLIDAY CATALOGUE IS NOW LIVE!!!

Woo Hoo! I am excited! You can view the Holiday Catalogue Online NOW – if you haven’t already seen it.  Here is the link below and I will add it to the side bar as well.  AND, if you want a little preview of some of the exciting new products, check the video out below.

holiday16_en-sp

You can head HERE to download the catalogue.

If you want your own copy of the catalogue sent to you, then ask me. 🙂

For your viewing pleasure, check this video out HERE.

Later today I am going to share some projects for our International Blog Hop so make sure you come back and visit.


Personal Ramblings, Stampin' Up!

HAPPY BIRTHDAY TO ME!!

8 birthday

It’s my Stampin’ Up! Birthday today.  8 years ago I joined Stampin’ Up! Back then I was joining to get a great discount of these awesome products, hopefully earn a little income along the way and it gave me an excuse to craft away my day!! Hehe!!  Now while I love the discount and the free products I get, the best part is all the friends I have made. Along with my local customers and friends, I have friends now from all over the world that I wouldn’t have known if I hadn’t become part of this great big family.

So I am celebrating all my new found friends.  Thanks for coming a part of my life. You are very special to me and I mean that.  xx

To many more fun years of creating – and hopefully inspiring you.  Thanks for visiting me. I know there are hundreds of Stampin’ Up! blogs around.  So I appreciate you taking the time to visit me.  I hope that when you visit you might feel inspired and maybe encouraged.  I hope to brighten your day.

Do comment and say Hello.  Tell me where you are from.  I love to hear from you.

Thanks again,

Jenny x 


Stampin' Up!

RETIRED PRODUCTS FOR SALE!


sale bright

Thanks to those people who came along to my recent BOGO sale.  It was great to see some of my loved products go to new homes.  BUT I STILL HAVE SO MUCH LEFT!!!!

I have now reduced some of the prices so these are not eligible for BOGO (Buy one Get One Free), but I am sure there are some great bargains for you.  🙂

These are only for Australian residents.  Sorry.

Click on my Page for “Retired Products For Sale” at the top and it will have the links there.

Catalogues, Stampin' Up!

HOLIDAY CATALOGUES ARE BEING MAILED OUT. ARE YOU ON THE LIST??

Holiday catalogue promo photo

It’s getting close for the Holiday Catalogue to go live.  September 1st!  You will be able to view it online BUT who doesn’t love to flick through the catalogue and see the samples and the products close up.  I think you are one of those people am I right??

So, if you are a resident of Australia AND you don’t have a current Demonstrator then drop me a comment/email and I will drop one in the post for you.  I am starting to mail them out so make sure you are on the list.

Have a wonderful day,

Jenny

3D projects, cards, Tutorials

POP UP EASEL CARD!

A customer called in last weekend and showed me a card she had made. She had gone to a class to do it.  (It wasn’t a Stampin’ Up! class and I don’t know who the original creator is). I loved the idea of the card so I had to make one. I had a little time to play around with it the other day. I call it a POP UP EASEL CARD. I used Confetti Celebration on mine.  I will show you the photos of the card (sorry, lots!) and then give you the instructions.

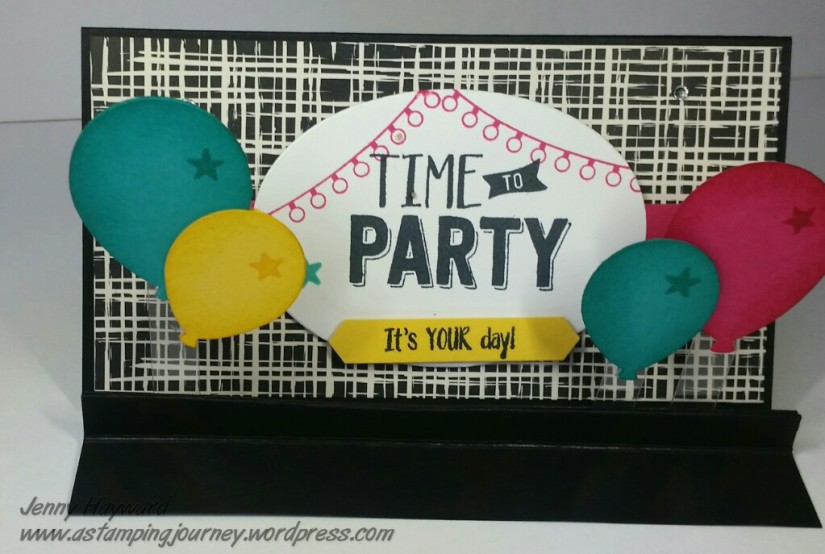
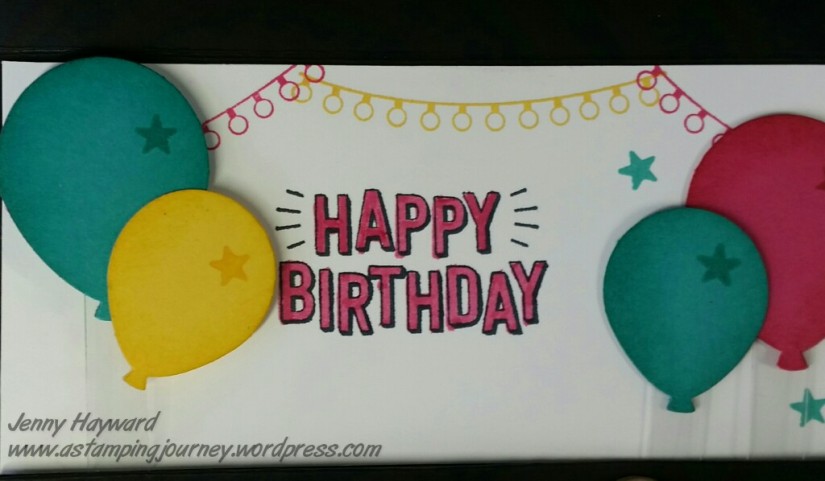
This is the front of the card.  The Rhinestones you see is what holds up the Easel part.  The balloons are suspended on strips of acetate in a folded crease.

Easel front

This is another view front on.  The Designer Series Paper is from the Playful Palette pack. The balloons are punched with the Balloon punch in Bermuda Bay, Daffodil Delight and Melon Mambo.  I sponged around the edges with the sponge and added a small star that from the stamp set.

Easel card

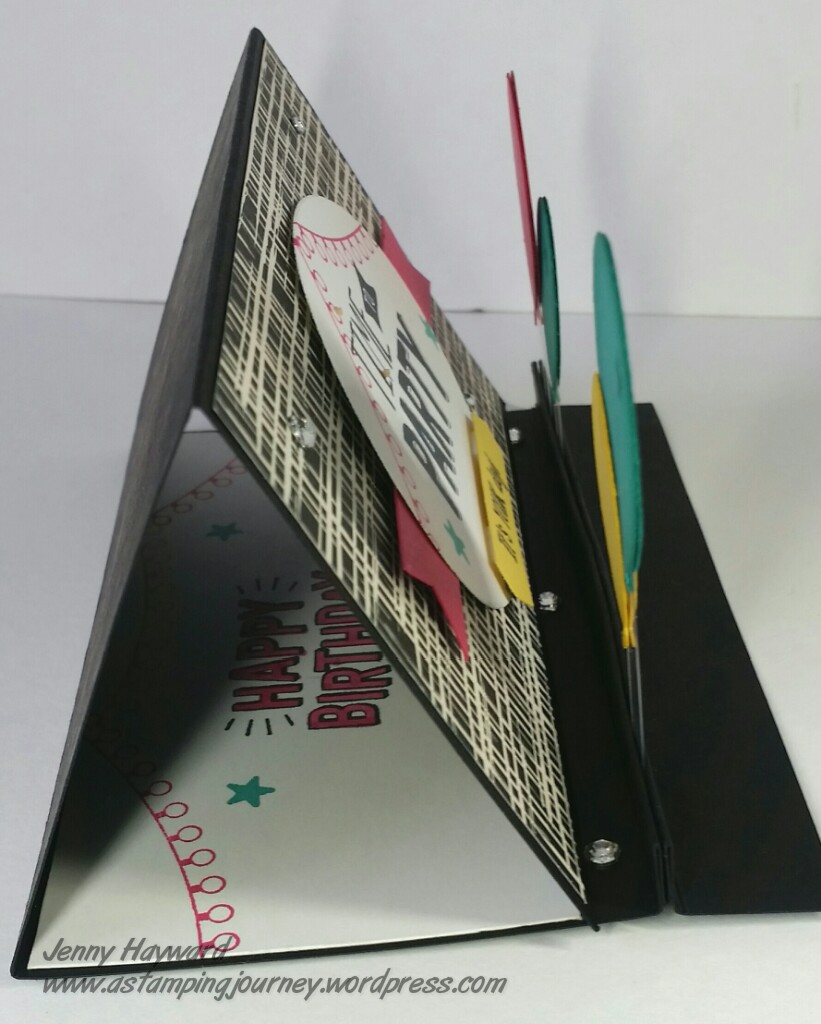
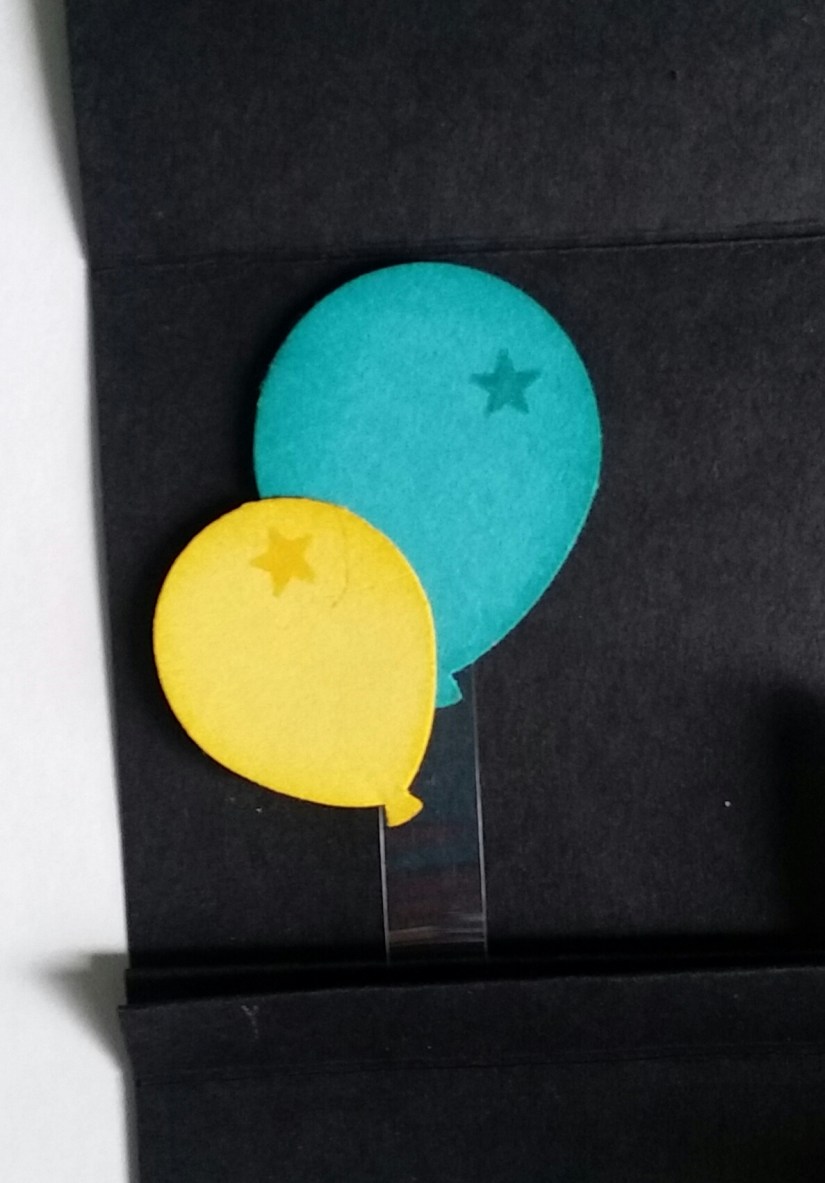
Side on view gives you an idea of the suspended balloons.  I punched 2 each of the balloons and adhered one to the front and back of the strip of acetate to keep it tidy.

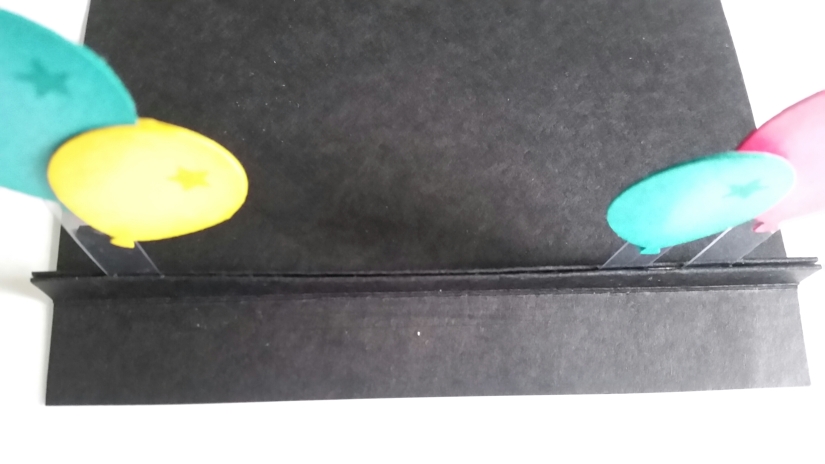
You can see the side view and inside of the card with the sentiment that I will show you below.

Side view of Easel

The card can fold flat for postage.

folded inside

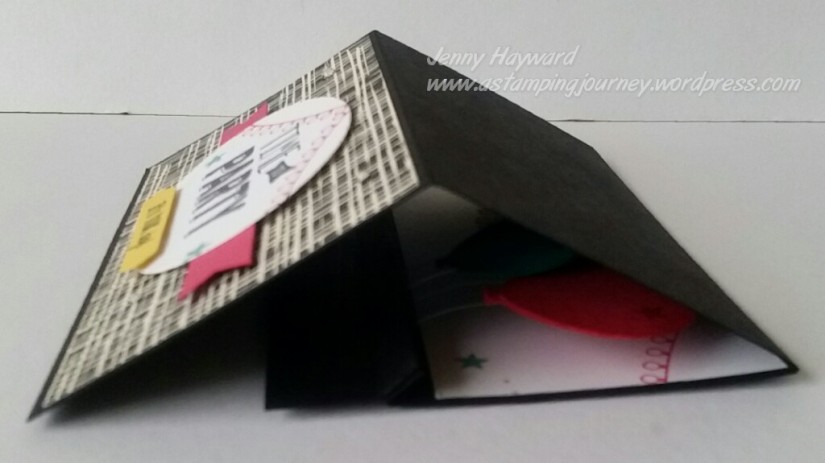
When it is folded flat it is a square card measuring approximately 15cm x 15cm (6″ x 6″) so you would need to make an envelope to fit but that is no problem with the Envelope Punch Board!

folded

This is inside of the card.  I continued with the sentiments from the Confetti Celebration set.

 inside

You can see when it is open that the balloons can fold flat against it.  This is a trick too. Whatever image or shape you have suspended in the front crease, you need to fold it against the inside of the card to test it out first before you put it together to be sure that it will fit below the score line for when it is folded flat.  You can’t have it squashed in. 🙂 Check the photo below to see what I mean. The balloons sit just below the score line.

Balloons lying flat

Now I will tell you how to make your own.

POP UP EASEL CARD

NB: I have included metric and imperial measurements.  For those following the Imperial measurements can you please just check these.  Maybe do a test run first. I am just concerned with all the “16th” measurements if they are correct.  🙂

What you will need:

Cardstock for base 14.8cm x 29.8cm (5 7/8″ x 11  3/4″).

Designer Series Paper 14.4cm x 7.6cm (5 7/8″ x 3″)

Whisper White card (inside piece) 14.4cm x 6.6cm (5 7/8″ x 2  3/4″)

Scrap card for your suspended images (Of your choice.  I have chosen balloons for this one).

Acetate strips 1 cm x 4-5cm (1/4″ x 1  1/2″-2″) You will trim these as you make the card depending on where you want your images to sit.

To construct your Easel:

1. On the long side score your card at 2cm, 3cm, 4cm, 5cm, 6cm, 13.8cm and 21.6cm.

(3/4″, 1  3/16″, 1  9/16″, 2″, 2  3/8″, 5  7/16″ and 8 1/2″)  – Please check the measurements.

2. Fold on all the score lines starting as I have shown in the photo in a concertina fashion creating a “M” shape at the beginning and then after folding it as a Valley fold on the next 2 score lines. (ie folding it up towards you). I haven’t shown those folded in this photo.

scored card

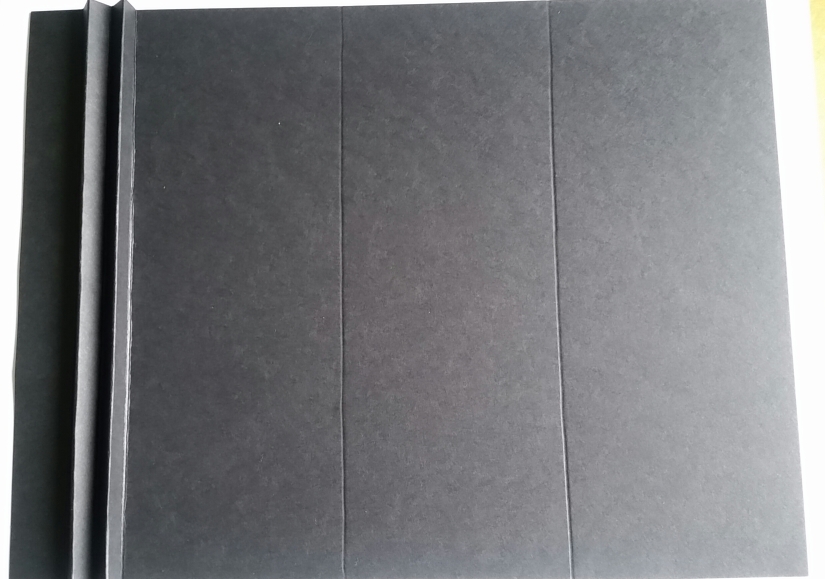
3. On the back of the card, place adhesive behind each side of “peak” that is formed. in the “M”. Adhere these together.  Check the photo below. (sorry if it is a little unclear).    This is it turned back to the correct side of the card.  It now becomes more a “V” shape which will be your crease for your acetate strips.

folded piece

4. After you have stamped and punched your images adhere them to the acetate strips. I used Fast Fuse to adhere them but you could use glue dots or other tape. I punched 2 balloons so adhered one to the back and one to the front of the acetate strip. Check the length of the acetate strip with the image to see if it is the right length BEFORE you adhere them in. 🙂 Trim the strip if necessary remembering you want to make sure they fit below the score line as I described above.

Place your adhesive (Fast Fuse or tape) along one edge inside the crease and adhere the acetate strips in place. Once in place then adhere the crease together. See the photo below.

Balloons suspended

5. Now you can create the front and the inside as you like.  I adhered the Designer Series Paper piece on the front.  The Whisper White piece I stamped and adhered inside.

+++

I hope you can follow this.  Perhaps I need to start making videos. 🙂  If you have any questions please don’t hesitate to ask me.

Jenny

cards, Stampin' Up!

SWEET SUGARPLUM THOUGHTFUL BRANCHES!

The delivery of my Thoughtful Branches bundle arrived today as I was creating. I had been waiting with anticipation for this set so I was excited. I had been deliberating what to make next so it arrived just in time!

I had been pinning ideas on Pinterest, so I could have CASED some but I wanted to see what I could create.  So here is what I made.

image

The Designer Series Paper is from the Playful Palette paper stack. The tree is cut from Early Espresso. I stamped the leaves in Sweet Sugarplum on the cardstock then cut it out with the Thinlits. The sentiment is stamped in Early Espresso and then matted it on Sweet Sugarplum. I tried several colour card bases but then settled on the Thick Whisper White card base. I think that was the right choice. Before I assembled the card I wrapped around Thick White Baker’s Twine. I think I should have gone with the thinner white though. Too late then though 🙂 It needed a little sparkle to finish so I cut the little birdie from Glimmer Paper.

There are so many elements in the stamp set and the Thinlits so it is very versatile. I think you would get lots of use from these making cards for different occasions. If you haven’t seen the set you can check them out in the previous post.

The bundle is $90.75. Of course you can get them individually but you can save 10% by buying the bundle. You can order this bundle from me. When you order from me You will also receive a PDF of some bonus projects PLUS receive double the VIS (loyalty) Points.

I am looking forward to creating more with these so stay tuned.

Jenny

Classes, Stampin' Up!

THOUGHTFUL BRANCHES BUNDLE FOR A LIMITED TIME!

Stampin’ Up! have released an exclusive Stamp set and Thinlits Bundle available for a limited time.  The ‘Thoughtful Branches Bundle is a beautiful set and available for a limited time from 2nd – 31st August.

Thoughtful Branches Header

Thoughtful Branches Thinlits

Thoughtful Branches Stamp set

Isn’t this a gorgeous bundle?  The beautiful font in the sentiments will add some elegance to your cards. This is such a versatile bundle with the stamps and the Thinlits making cards for so many occasions. Imagine what you could create with this set!

You can buy the stamp set and the Thinlits separately but why not save 10%. The Bundle price is $90.75.

**BONUS**

Receive a PDF of some bonus projects PLUS

Receive 2 VIS (Loyalty) points when you purchase this from me. 

You can order this Bundle directly from me OR through my store.  Order HERE at my store. I can ship to anywhere in Australia.

I will be holding a class showcasing this set on the 13th August so mark the date down now.  I will try and offer it by mail too so check back soon.

Jenny

cards, Stampin' Up!, swaps

PINWHEEL TAGS TEAM SWAPS!

I have been on a roll with the Pinwheels lately using the Swirly Bird set.  I needed to make some swaps for our team meeting last night so I decided to make up some quick tags with them.  WELL….. That was the plan.  These tags took hours.  Nothing was going right yesterday.  I was getting ink everywhere, I was cutting things wrong!!! Do you have days like that?  Anyway, I got them done.

swirly tags

I made a few variations of them and a number of each. For the colours on the Pinwheels they are from left: Wild Wasabi and Emerald Envy; Sweet Sugarplum and Peekaboo Peach; Blushing Bride and Peekaboo Peach; Sweet Sugarplum and Elegant Eggplant.  I used some scraps of the Playful Palette DSP stack too.  (I am on a mission to use all of my DSP!).

The white card measures 13cm x 5cm (5 1/8″ x 2″) but you can make them any size you like.  These will fit on a card front to make a full card.  I rounded the tops with the Corner Punch.

The sentiments are from ‘Thoughtful Banners’.  I punched them out using the Classic Label Punch.  It’s cool that you can punch them different ways to create different effects. I coloured the Rhinestones with a black sharpie.

I got there in the end.  I hope you like them.  🙂

Jenny