cards, Techniques, Tutorials

5 WAYS WITH PAPER – DAY 2!

Day 2 of 5 Ways With Paper.  I have another great card to share with you using your lovely paper.

This card was inspired by one by Lisa Pretto on inkbigacademystamps.

I have used the Share What You Love Specialty paper again – because it is so gorgeous!

TO CREATE YOUR OWN

On your base card adhere a piece of co-ordinating card slightly smaller than your base.

Cut your pieces of paper.  You can make them any size you like of course but to give you the measurements I have used:

Top Left piece measures 8cm (width) x 9.5cm (length) or 3 1/8″ x 3 3/4″.

Bottom Right piece measures 8cm (height) x 7cm (width) or 3 1/8″ x 2 3/4″.

Decorate as you like.  I cut a decorative label from the Stitched Labels Framelits.  The sentiment is from the One For All set.  I sponged around the edge of the white oval with Old Olive.  The little Razzleberry flower is cut from the Seasonal Layers Thinlits. It needed something underneath the label.  I played around with a few different options but I wasn’t happy with them.  In the end I went with a strip of Rich Razzleberry card that I had flagged both ends.

Hope you like it.  Thanks for visiting today,

Jenny

cards, Techniques, Tutorials

5 WAYS WITH PAPER – DAY 1!

Do you love the gorgeous Stampin’ Up! paper?  It is so fantastic isn’t it.  We buy it, look at it, stroke it – and then file it away for a special occasion.  Do you do that?

We have a wonderful Paper sale on at the moment to buy 3 and get one free.  More of that gorgeous paper to file away.  Well, this week we are going to get that paper out and use it (I would like to write that last sentence in capitals but you might not like me yelling at you). Each day this week I will bring you a different way to use that paper.  Remember the hashtag from a few months ago when I shared ways to use paper #usethatpaper  Well, let’s get on with it again this week.  Who is in?

For today’s card I have used the gorgeous Share What You Love Specialty Designer Series Paper.  It is not one available as the Buy 3 get one free promotion but it is so beautiful to use and probably one of those packs you have sitting there too special to use.

The idea for this card came from Jackie Bolhuis from klompenstampers.

This style of card works really well with beautiful prints on both sides of the paper.

HOW TO CUT YOUR PAPER

Firstly, cut your piece of Designer Series Paper just slightly smaller than your card base.  (Metric paper size would be 14.4cm x 10.1cm). The US card sizes are different to the South Pacific (and I think) Europe market, so I will just give you a general guide but if you cut your paper to about 1/8″ shorter on both sides to the front of your card base. Card base being 5 1/2″ x 8 1/2″ I think. On your short edge cut it vertically at the point about 2/3 the way across.  For metric measurements I cut it down at 7cm.

Take the Left hand strip, turn it 90′ anticlockwise and cut it approximately 2/3.  For metric, this was at 8.4cm.  Place it aside and it’s easier if you keep it in it’s position one above the other. Take your right hand strip that you had cut previously, turn it 90′ clockwise (so reverse direction) and cut it at 2/3.  For metric this would be at 8.4cm. Place it next to your previously cut pieces in their positions.

You should have 4 sections of different sizes.  With the bottom left piece flip that over.  For the top right piece flip that piece over. Adhere these pieces in position on your card base.

FINISH YOUR CARD

Decorate your card as you like. I had the decorative strip and the sentiment sitting on my desk from unused projects so it was good to be able to use these. The strip was cut with Dazzling Diamonds Glimmer Paper from the Petals and More Thinlits.  Shame you can’t see the sparkle from that. The sentiment is stamped with a greeting from Happy Birthday Gorgeous and cut with a Framelit from the Stitched Labels Framelits.  I cut the decorative circle one in Petal Pink which is from the Stitched Labels Framelits also. It is hard to see but I also cut a small circle from Vellum from the Stitched Shapes Framelits.


Come back tomorrow and each day this week as I bring you a different way to use your paper.  Thanks for visiting me today,

Jenny


cards, Stampin' Up!, Techniques, Tutorials

WEDNESDAY’S WOW! #32 – SPARKLY RAINBOW HAPPY BIRTHDAY!

For today’s Wednesday’s WOW! #32 I wanted to show you how I created the sparkly rainbow effect on the card below.
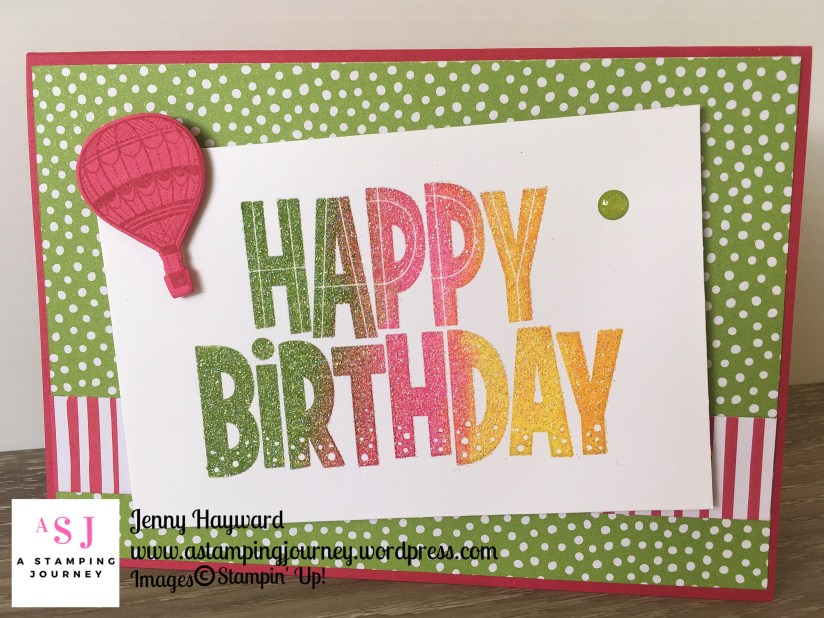
I wish you could see how sparkly this really is.  I have a close-up of the card below but it still doesn’t show it well but it may give you a little idea.
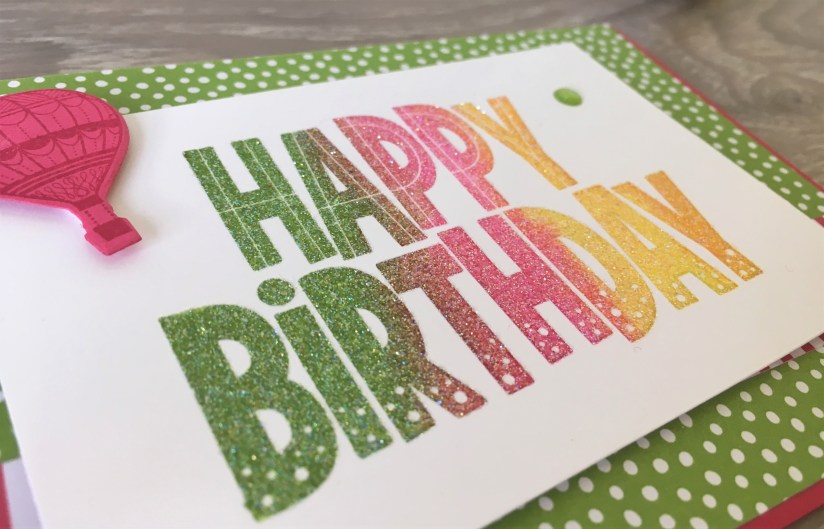
The Happy Birthday is from the One For All set that I have been sharing recently.  I went for a rainbow effect by sponging on the colours and then adding some Versamark and Dazzling Diamonds and Heat and Stick.  I have the step by step below.

Since the greeting is so bright and fun I kept the rest of the card simple. The paper is from the Brights Designer Series Paper Stack using the Granny Apple Green and the Melon Mambo print.  I was going to add a balloon but then decided on a Hot Air Balloon from the Lift Me Up set for something a little different.  I added a Glitter Enamel Dot for a little sparkle.

CREATING A SPARKLY RAINBOW

I used the Stamparatus for this technique and I will tell you the advantages of this below.

1. Position your piece of card on your Stamparatus ready to stamp it.  Place the stamp face down on your card in the position you would like it.  Fold over the top plate of the Stamparatus to pick up the stamp.

2. TIP: Whenever you are inking your stamp on the plate it helps to place an inkpad or a clear block under the plate so the plate is relatively level. 

For your card, select your ink colours you want to use and matching sponges or daubers.  The colours I used were Granny Apple Green, Melon Mambo, Daffodil Delight and Mango Melody.  TIP: I have punched out tabs from cardstock for the ink colours using the Pretty Label Punch.  I stapled the tab on to the sponge.  You can see it in the photo below. This way you won’t mix up colours when you are sponging.
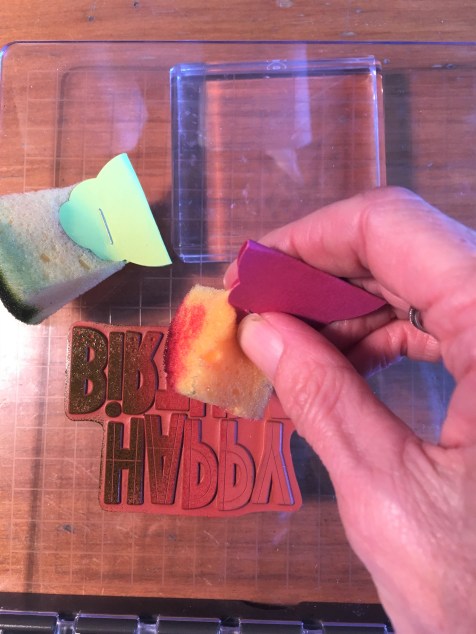
3. Fold over your plate and press the stamp on to your cardstock.  Rub over the plate on the back of the stamp to transfer the ink.  NOW – because I had the Stamparatus, firstly I knew it would be straight BUT I could re-sponge over any spots that didn’t come out well on your stamped image and I could stamp it again. 

What I did find also when I first stamped it I had a little too much yellow on the right hand end so I went back and sponged the Mango Melody just on the end. I knew it was going to turn out in the right spot when I stamped again thanks to the Stamparatus. I think the extra colour made a big difference on the card too.

4. Now to emboss your piece.  Firstly, wipe over your card with the Embossing Buddy.  Clean your stamp with the shammy then pat your Versamark over your stamp.

5. Turn over your plate and press down onto your card.  With the Stamparatus you know it will be in the right place.  Rub over the back of your stamp.

6.  Remove your card from the Stamparatus.  Sprinkle over the Dazzling Diamonds and Heat and Stick Powder. I have mine mixed together already in a small tub with 1/2 Dazzling Diamonds, 1/2 Heat and Stick.  It is so much easier having them combined together. Heat the powder with the Heat Tool.  Your sentiment should be all sparkly. 🙂

———-

Hope you can make some sparkly sentiments or even images.  Sparkly flowers might look nice.

Thanks for visiting.  I hope you like these Wednesday’s WOW! segments.  I have fun bringing them to you and hope they inspire you in your stamping.  Let me know if there is something particular you would like to know about.

Jenny

cards, Classes, Techniques, Tutorials

STAMPING IN THE ROUND!

Today I have had my Stamparatus class showing lots of fun ways to use this great new tool. I posted the projects we were making a couple of posts back but I thought I would show you more detail of one of the projects.  I don’t often share the details of class projects but today I want to share it would you my lovely blog readers.

The Stamparatus is a great positioning tool for your stamping but it can do so many other fun techniques.  I think my favourite is stamping in a circle.  I created these 2 projects with them.  The first one is the one we made in class and everyone loved it.  I think this might have just sold them on it. 🙂

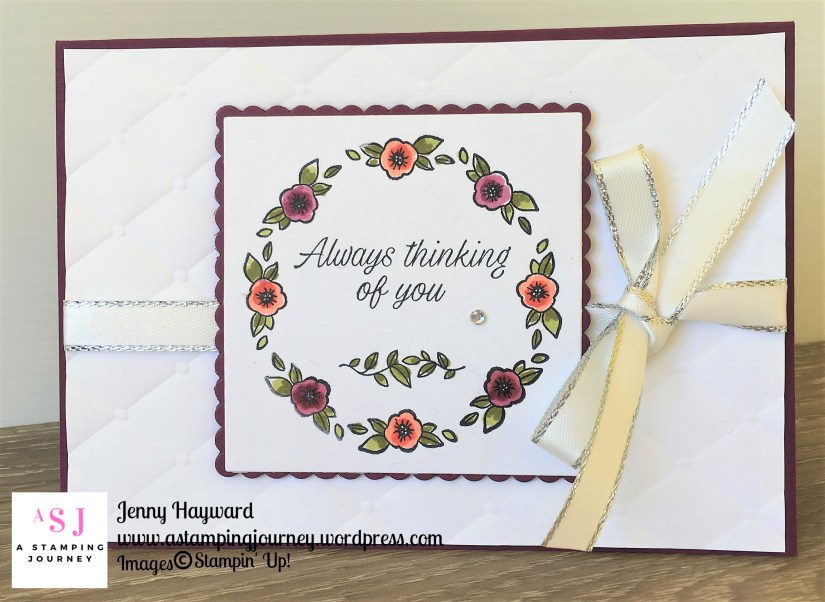
This one is using the Accented Blooms set.  The tiny flower creates a lovely flower wreath.  These were coloured with the Stampin’ Blends.  The White mat was embossed with the new Tufted Embossing Folder. 

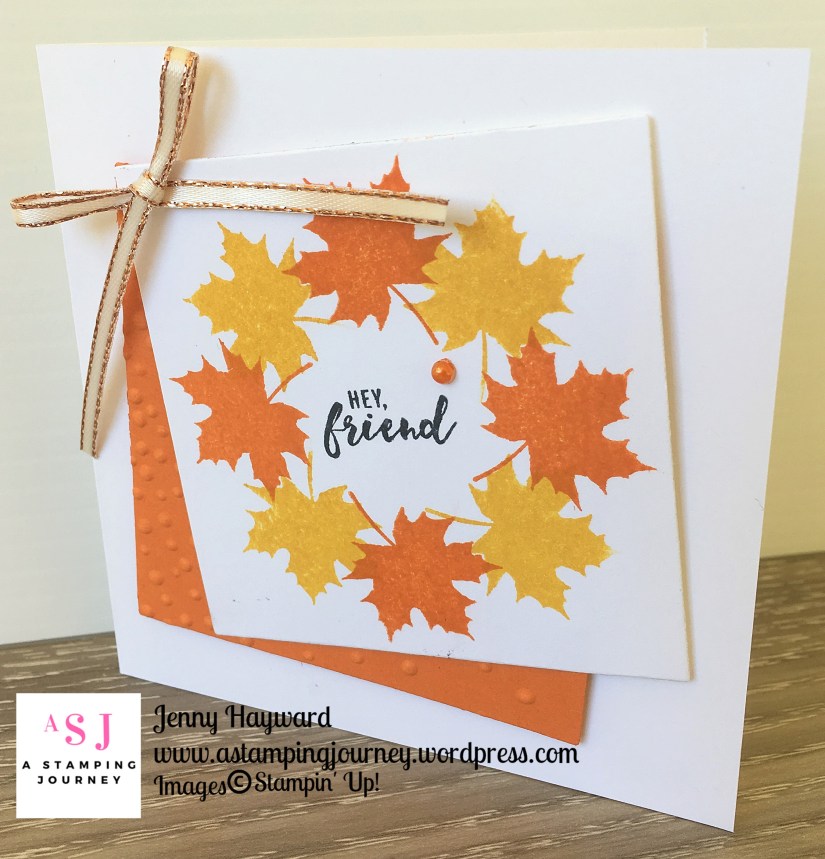
I was playing around with a few other ideas.  This leaf is from the Colorful Seasons set.  Wouldn’t this be a lovely idea for a Christmas card?? (filing away that idea so watch this space). 🙂

This is a mini card measuring 10cm x 10cm (4″x4″).  The sentiment is from Itty Bitty Sentiments.

So how you do this?? There are lots of great tutorials online.  Rather than me repeat it why not head to Allison’s Blog -> HERE and see the video.

Have fun with it. If you haven’t got one yet, you might just have to get one. 😉

Jenny

3D projects, cards, Techniques, Tutorials

WEDNESDAY’S WOW! #26 – SPINNER CARDS!

I have a fun Spinner card for you today for Wednesday’s WOW! #26  I made this recently as a request from a friend.  The same one who requested the 1st Birthday card in the last post.

I thought you might like to see how to put one together.

I was asked to make a Baby Shower card in yellow/cream colours.  I wanted to make something a little different so created it as a Spinner card.

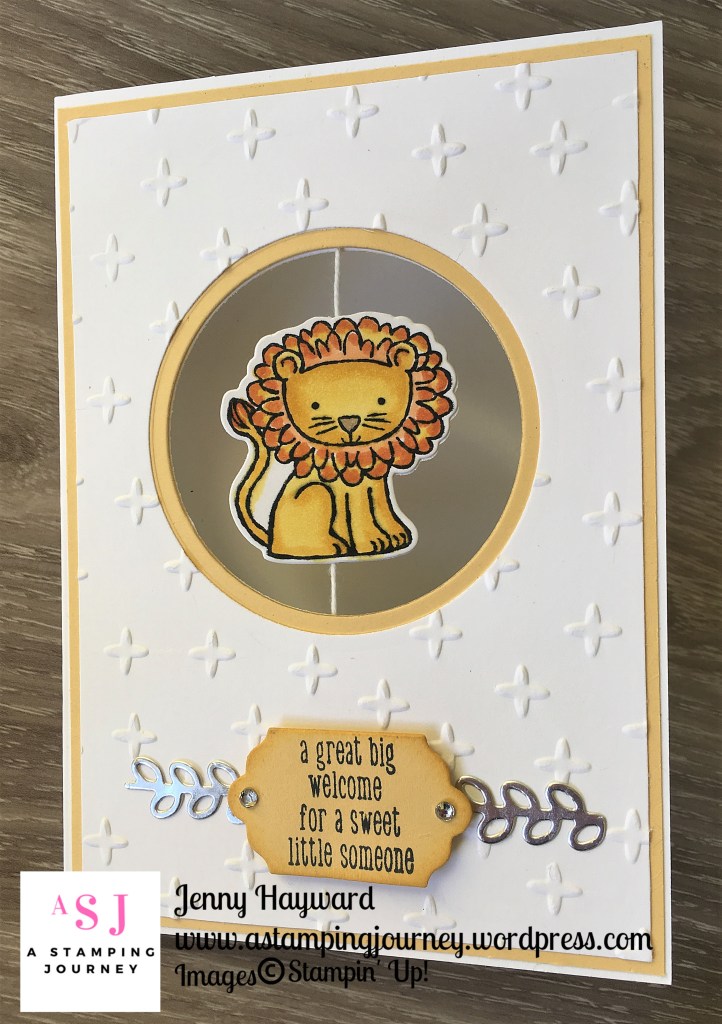
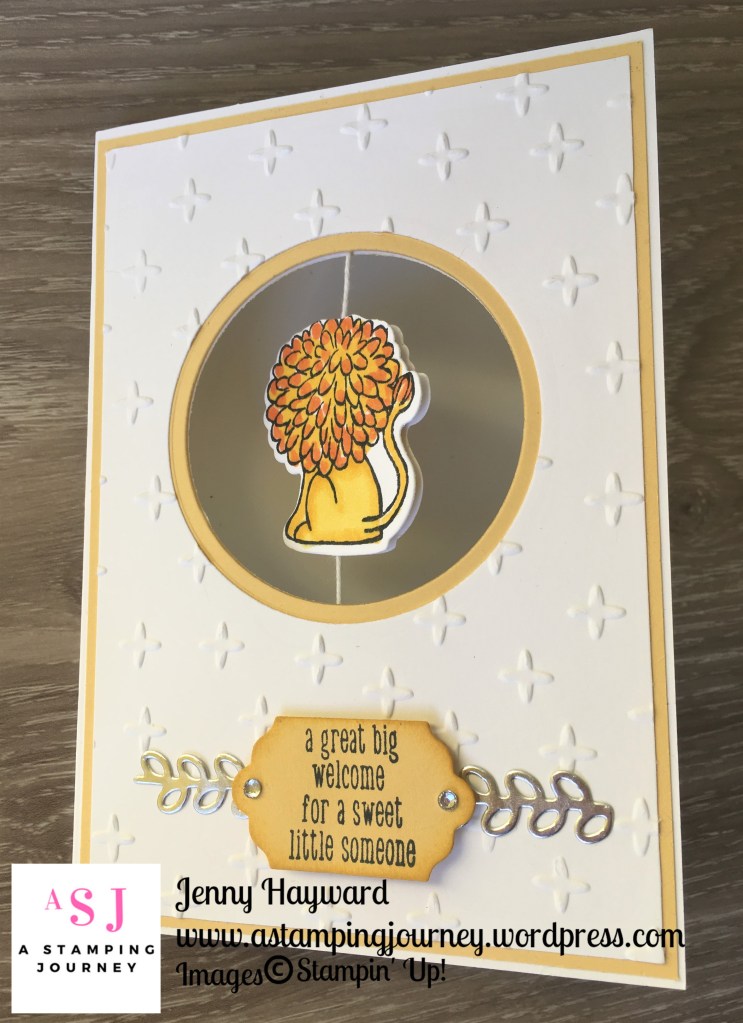
This is the card using the set A Little Wild.  It was the first time I have used this set – and I have had it sitting there for a while! The great thing too is that it has a back stamped image so this works great for the Spinner Cards PLUS it has matching Framelits so you don’t even have to hand cut it. 

This is the front of the card.  I coloured the cute little lion with the Stampin’ Blends.

And we have the back of the Spinner.


HOW TO CREATE A SPINNER CARD

1. Cut a card base to a standard card size.  I used Whisper White here. Cut a piece of So Saffron card slightly smaller and a piece of Whisper White smaller again.  For metric I reduce the card size measurements by 4mm on each piece.  For US card sizes you might like to reduce the size by 1/4″ on each piece.  Of course it’s totally a personal preference.

Cut a circle using the 2nd largest Circle Framelit in the Layering Circles Framelits set from your smaller piece of Whisper White card.

2. Layer all the pieces together starting with the card base then the So Saffron piece then the Whisper White.  Place the next size down circle Framelit inside the already cut circle on the white.  See the photo below.

3. Carefully place the card pieces in the Big Shot to cut your circle out.  You may carefully remove the top white card piece if you like without disturbing the position. (Just a tip: If you are unsure you can lightly tracing the inside of the circle Framelit with pencil so you can see where to line it up if it moves before cutting it).

4.  Take the White card base with the right side facing upwards.  Place a length of twine or even fishing line across the cut out circle.  Adhere both top and bottom with tape.  I have used the thin White Baker’s Twine which has now retired on this one.  Be sure that the twine is pulled tight when you are taping it down.

5. Adhere the So Saffron card piece over the top of the white card base.  Before adhering the top white card piece run that through your Embossing Folder if you like to.  I used the Sparkle Embossing Folder. 

Stamp and colour your images and then cut them out. On the back of your images run a length of Snail Adhesive on them. Place the front one over the centre of the twine.  Turn your card over and adhere your other image directly on to the first one. You can now spin your images around and let it go and watch it spin.

—–

I made a Christmas Spinner card a while ago which you can see -> HERE.  This was based on a similar idea but I used Designer Series Paper and one layer with the card base.

Have fun spinning.  I would love to see your versions. Share your Spinner cards you create by emailing me them or tagging me.  I would love to see them.

Jenny

Catalogues, Stampin' Up!, Tutorials, Videos

WEDNESDAY’S WOW! #23 – LET’S LOOK AT THE NEW INKPADS!

Have you heard that the Stampin’ Up! inkpads are changing in design?  This is because it was time to update the moulds that they are made with.  So it was time for a new design.  I think they are much easier to open.  I hope you will too.  I managed to get one of the new inkpads at Onstage so I thought I would do a little comparison of the new pads with the current ones.

You can view the video below. (**If you receive the updates by email and the video doesn’t show up then please head to my blog post by clicking on the heading above and it will take you to view it there – or you can view it on my Youtube channel: Jenny Hayward_A Stamping Journey).

Let me know your thoughts on the inkpads.  Also, I would love feedback on the videos too.  I am just starting out in this area and would love your input – good or bad. I know I have a long way to go 🙂

So for Wednesday’s WOW! #23 – Comparing the New with the Old.

So what do you think??

Jenny

cards, Challenges, Techniques, Tutorials

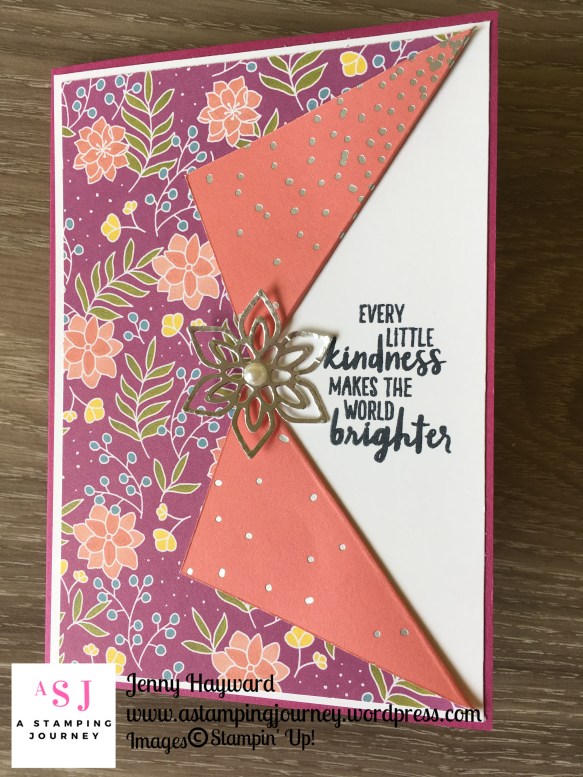
SWEET SOIREE COLLAR CARD!

I have another card to share with you today using the gorgeous Sweet Soiree Specialty Designer Series Paper.  One more way that you can #usethatpaper  I am on a mission to use up my paper instead of storing it and hoping to help you in using your stash. There are some lovely, gorgeous paper to come in the new catalogue, so you need to use this paper.

I have to admit one of the dilemmas of using the gorgeous Stampin’ Up! paper is – which side do you use?? Usually there is gorgeous prints on both sides and you don’t want to cover one to show the other side.  SO, I think this fold is great as you can see both sides at once.

This card is a Collar card.  I was reminded of this card when I went looking through some older blog posts. You can see that one I made -> HERE.

I liked both sides of this piece of Sweet Soiree paper so it was nice to see both of them.

To create a Collar Card

Cut your white card slightly smaller than your card base – 4mm (1/4″ ) smaller. Cut your piece of Designer Series Paper 4mm (1/4″) smaller than the white card mat.

On your piece of Designer Series Paper, at the half way point on the right hand side, which is approximately 4.8cm.  Cut in from this point 5cm (2″).  Fold back each section from the end of the cut to the corner of the piece of paper.

Adhere this piece on to your white card and then on to the card base.  Adhere under each flap to hold them down.

Stamp the sentiment on the white section. This one is from the Waterfront set. I cut a flower from the Flourish Thinlits from Silver Foil.

—-

Now you can see both side. 🙂

Have a great day,

Jenny

cards, Catalogues, Techniques, Tutorials

SOMETHING QUICK WITH THE SWEET SOIREE PAPER!

OK, Let’s chat.  Do you have lots of pretty paper sitting in your craft stash??  I can guess you do.  It looks so nice sitting there but you are scared to cut in to it or you might be saving it for a “special” project?? Yes I know.  It is tough!

So a new catalogue is coming very soon and we will have more pretty paper to collect.  We need to use this paper we have now.

SO… Let’s use it.  I am going to be sharing some projects over the next days and weeks to USE THAT PAPER.  Will you join me??  I am sharing these projects on here and Facebook and Instagram and adding #usethatpaper  So you can join in with me.

Today’s project is using that gorgeous SweetSoireepaper.  It is so pretty and I was really hesitant to use it but really …

Anyway, here is the card.

Cut the Designer Series paper about 2cm (3/4″) shorter than you would usually.  Cut off 2.5cm (1″).  Adhere them to the Whisper White card with the smaller section at the bottom of the card.  Stamp your sentiment in the white space.  This is from the set Birthday Blossoms.  The leaf is from the Flourish Thinlits cut from Dazzling Diamonds Glimmer Paper although you can’t see the sparkle too well.

ok. Go and grab some pretty paper and #usethatpaper

Have a happy, crafty weekend.

Jenny

cards, Stampin' Up!, Tutorials, Videos

WEDNESDAY’S WOW! #22 – BACK TO BASICS CUTTING YOUR CARD!

I have been asked often about how to cut your cardstock to make your cards.  When people come to my classes the card is already cut for them but they want to know how to go about it at home.  So finally I have put together a video to share with them but also with you if you are not sure.  So for Wednesday’s WOW! #22 we are looking at How to cut your card.  

I hope you do find it useful and might be able to refer back to it when creating your own cards.

NB: I realised that there is some glare from the trimmer in the video. I apologise in advance for that but I hope it still gives you some idea.

Also, the measurements I give are for metric card.  The US card size is different but I have mentioned about the measurements in the video.

The measurements I used in the video I have listed below so you can refer to them later.  These are my personal measurements though.  These measurements are for a standard card with equal layers.

Standard Card measurements

Card base: Cut A4 card at 14.8cm.  Score on the long side at 10.5cm.

** For the layers for the standard card I decrease the card size by 4mm.

1st layer: Cut card 14.4cm x 10.1cm.

2nd layer: Cut card 14cm x 9.7cm.


For US Imperial card size: These are my understanding of the measurements. Do Check your own measurements.

Cardstock size is 8 1/2″ x 11″

Card base: Cut card in half at 5 1/2″. Score card on the long side at 4 1/4″

** For the layers I would suggest decreasing it by 1/4″ but check to see what you personally feel.

1st Layer: Cut card 4″ x 5 1/4″.

2nd Layer: Cut card 3 3/4″ x 5″.                            Hopefully these measurements are OK. 🙂


I hope this is helpful.  I hope to bring you more Back To Basics videos in the future.

Jenny


cards, Catalogues, Onstage, Stampin' Up!, swaps, Techniques, Tutorials

WEDNESDAY’S WOW! #21- BABY WIPE PETAL PALETTE SWAP CARD FOR ONSTAGE!

I will tell you more about Onstage shortly but I thought since it is Wednesday.  It is time for Wednesday’s WOW! #21.

This card was my swap for Onstage in Sydney.  I thought I would share this with you today and show you how I created it.

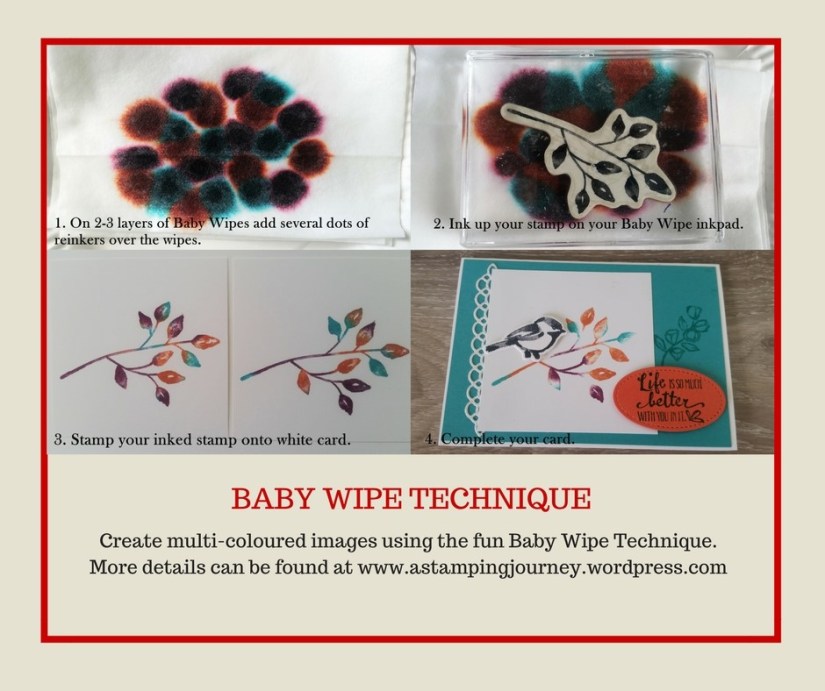
This is made with the Baby Wipe Technique.  I had wanted to try this technique for some time and was reminded about it recently.

Here is how to create your own.

Below is a graphic for you to PIN but below is more details on how to do it.

1. Fold 2-3 Baby Wipes in half and lay them on a plate.  A smooth plastic plate is best.  I ended up using a couple of paper plates together as that is all I had suitable.  Be sure to have a couple though as the ink leaks through.  The paper plates are ok for a small number of inkings.  Add dots of your first colour of reinker over different spots on the wipes.  Then add your 2nd colour and lastly your 3rd colour.  I think 3 colours are enough.  The colours I used are Bermuda Bay, Tangerine Tango and Rich Razzleberry.

2. Ink up your stamp as you would normally on an inkpad.

3. Stamp your inked stamp onto your card.  If you are stamping multiple of images then clean your stamp and ink your stamp again between each one. Your Baby Wipe Inkpad should last quite a number of stampings.  I think I got 15-20 from the one inked wipe.

4. Complete your card as you like.

To finish my card.

Adhere the Bermuda Bay card mat to a Thick Whisper White card base. Cut the circular Border Thinlit from the Petals and More Thinlits from Dazzling Diamonds Glimmer Paper and adhere down the left hand side of the Bermuda Bay Card.  Adhere your stamped white card you had created with the Baby Wipe Technique on to the card.  On the right hand side stamp the flower image from the Petal Palette set in Bermuda Bay ink.  

Stamp the bird in black on scrap white card and cut it out with the matching Framelit from the set.  Stamp the sentiment on to Tangerine Tango card and cut with the Oval from the Stitched Shapes Framelits.   Raise both the bird and the sentiment off the card with Dimensionals.

—

Have you tried the Baby Wipe Technique before?? I am keen to try it again.  Each time you stamp it works out differently so give it a go if you haven’t.

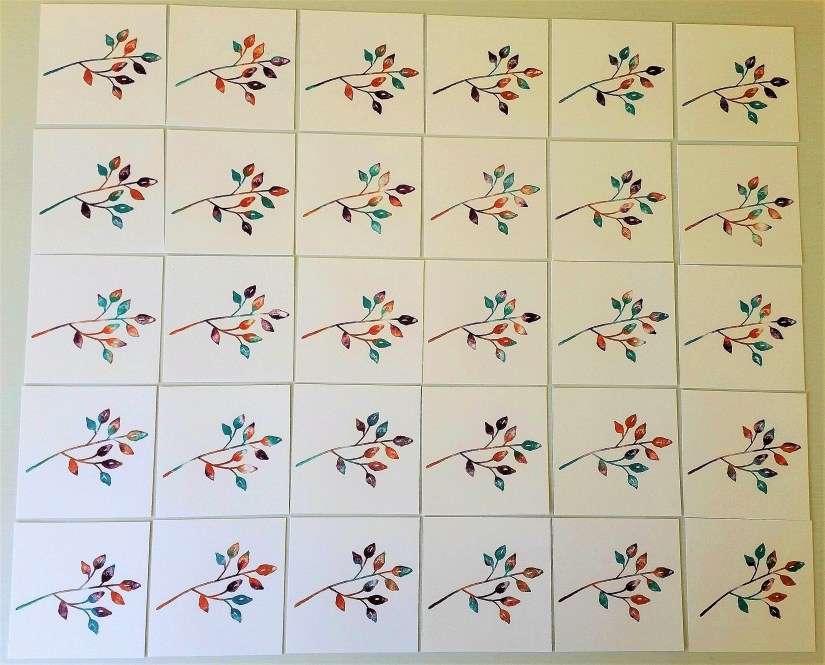
Just to show you how different they can be.  Here is all the stamped pieces when they were done.  I inked the leaf in different positions on the wipe at times to get the variations.

(Not the best lighting but it might show you). 🙂

Have a great day,

Jenny