Blog Hops, cards, Catalogues, Tutorials

LATCH FOLD WITH TRANQUIL TULIPS!

Yesterday I shared a Christmas Latch Fold card.  Today I have another version using the Tranquil Tulips set.  OK, I did this card first and then realised for the Blog Hop that it was for the Holiday Catalogue.  I thought I would share it with you today and give you the tutorial for it. 🙂

I have used the Birthday Blossoms set for the front and inside.  I think it works well.  The small flower to hold the flap was punched with the 3/4″ circle and then layered on a circle punched from Cherry Cobbler with the 1″ circle punch.

Here is the inside.  I added a strip of the Old Olive paper from the Color Theory Paper Stack. 

CREATE YOUR OWN LATCH FOLD CARD

** Apologies in advance for Imperial measurements.  I am not too familiar with your standard card size so just check the measurements first for the front and inside card mats 🙂

1. From a standard size card base cut off 2.5cm (1″) off the front of the card.

2. Stamp your front image on Whisper White card. This piece was 7cm x 14.4cm.  (for Imperial, measure a piece slightly smaller than the size of your front panel).  If you like add a strip of Dazzling Diamonds Glimmer Paper. 

3. Cut a strip for your latch which measures 10.5cm x 2.5cm and score it at 8cm.  (4 1/8″ x 1″).  The white sentiment strip is 7.6cm x 2.1cm (3″x 3/4″)

4. For the inside panel cut a piece of Whisper White for the card mat slightly smaller than the inside of your card. (10.1cm x 14.4cm).  (Imperial measure approximately 1/8″ smaller than the inside of your card).  Add a strip of Designer Series Paper (14.4cm x 3cm) (Imperial 1 1/8″ x length of your card).  BEFORE you stick this down to the inside of your card adhere your latch strip by adhering the smaller section of your strip behind your white card mat.

5. Fold this over the front of the card and position your punched circle piece in place that will hold your card closed.  You can add a Dimensional to the back of the circle to raise it up but remember to ONLY ADD IT BEHIND HALF of the circle to allow you to fit the latch under it. 

Hope this makes sense.  Have fun making your Latch Fold card.

Jenny

3D projects, Blog Hops, cards, Stampin' Up!, Techniques, Tutorials

STAMPIN’ DREAMS BLOG HOP – BLACK, WHITE AND 1 OTHER COLOUR!

Today I am joining in with the Stampin’ Dreams Blog Hop.  You might have just come from Jenny Hall’s blog HERE.  This month’s theme for the Stampin’ Dreams Blog Hop is Black, White + One.  Any colour you choose.  There are so many options really.  What to choose??  I really wasn’t sure what to go with until I sat down and started making the card.  My +1 for this Blog Hop is BERRY BURST!  Such a fun colour and I think it really “pops” when added to black.

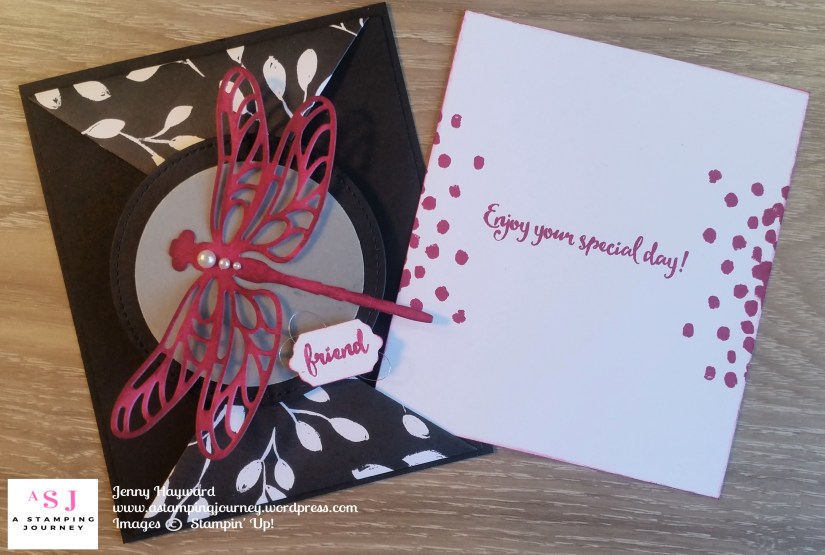
Here is the card I created.  It’s a Triangle Pocket card using the Merry Little Christmas Designer Series Paper.  Don’t think of this paper just for Christmas!

I found the original card inspiration HERE.  I changed the measurements a bit and also how I made it so I will add the tutorial below for you.

You can continue on your Blog Hop now and then come back to see how you make them.  Now head off to Sharon’s blog -> HERE. 

———————–

CREATE YOUR OWN TRIANGLE POCKET CARD

You will need:

Base card – Basic Black 13cm x 10.5cm (5 1/8″ x 4 1/8″)

Inside card (I used as the inside lining) – Basic Black 12cm x 10cm ( 4 3/4″ x 4″)

Whisper White card  12cm x 10cm (4 3/4″ x 4″)

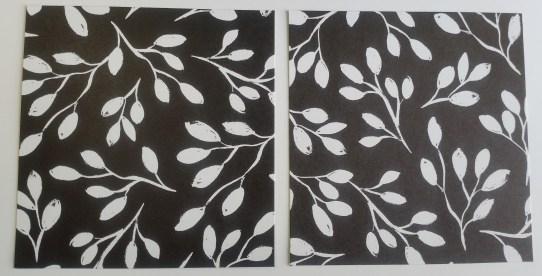
2 x Designer Series paper (DSP) squares 10cm x 10cm (4″ x 4″)

scrap card for embellishing.

1. Take your 2 Designer Series Paper squares.

2. Turn the papers so that the pattern that you want on the outside is faced down.

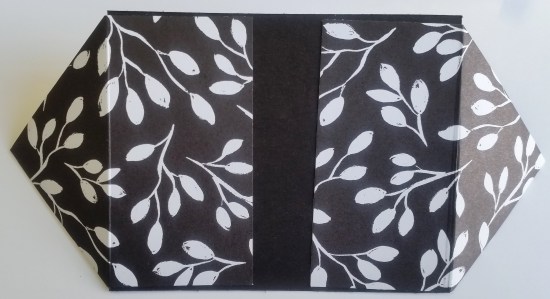
On each square fold the top edge in to 2 triangles.  Be sure that both triangles on the piece match.  I found it helped to just hold the mid point on the edge of the square with your finger or the bone folder as I folded it in. Fold up the straight edge over the triangles.  I actually placed the paper on my paper trimmer and scored a straight line just under the triangles to give a crisper fold.


Open up the straight edge fold again. Place adhesive behind the triangles to adhere them down.

3. Place adhesive on the back of the patterned paper along the straight edge and adhere them down to the back of your card lining piece. (for this I used Black card).  I added this step as I liked to hide the edge of the triangles to make it look neater especially as it is a colour I didn’t want showing.

4. Place adhesive on the back of the card lining piece and adhere that to your card base with the triangles sticking out.

5. The triangle pieces don’t meet in the middle but that’s OK.  You can embellish the front.  I added some diecut circles (one in black and one in vellum) and a diecut dragonfly from the Detailed Dragonfly Thinlits.  On the dragonfly I sponged in places with the Berry Burst Ink.  I also went over just the “friend” word from the Dragonfly Dreams set with a Berry Burst Marker and it was then cut with the smallest of the Lots of Labels Framelits. 

6. On the inside white card insert I stamped the sentiment and the spots from the Dragonfly Dreams in Berry Burst and added just a little sponging around the edge.

What do you think?  I think I want to make more of them that’s for sure. 🙂

Jenny


cards, Christmas, Techniques, Tutorials

CHRISTMAS PINES ECLIPSE CARD!

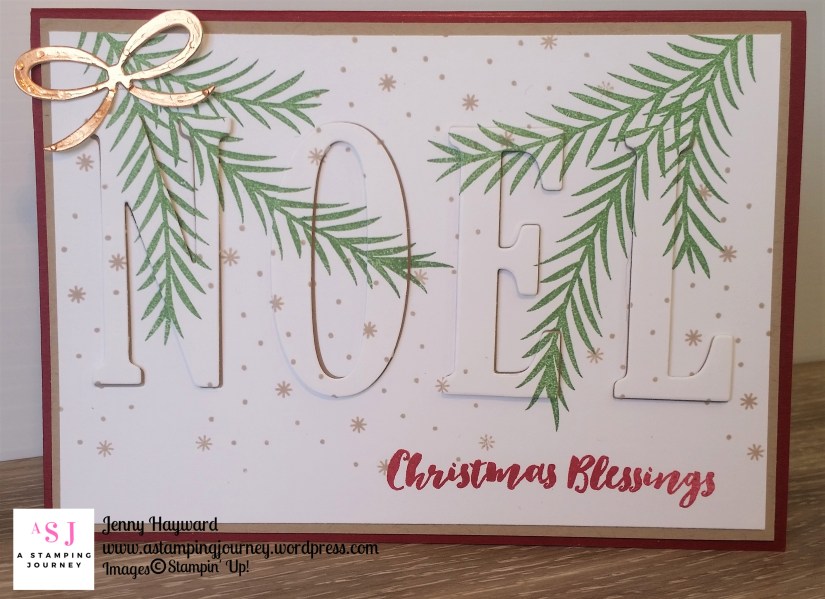
I have been playing with the Eclipse technique recently.  You can see one of them a couple of posts back I made for a colour challenge.  This one is a Christmas one using the Christmas Pines stamp set.

The base card is Cherry Cobbler and the card mat is Crumb Cake.  The pine leaves are stamped in Garden Green. The Gold Foil bow is cut from the Pretty Pines Thinlits.

Have you tried the Eclipse Technique yet.  SO easy but so effective.

Create the Eclipse Technique.

The Eclipse Technique is cutting the words or shapes directly from a stamped card piece and raising them off the card

1. Stamp your card with your chosen images.  You can use a piece of Designer Series paper (patterned paper) too as an alternative.

2. For this card I used the Large Letters Framelits to cut the word out of the white card.  You can use any dies though to cut other shapes from the stamped white card or paper mat.

3. Adhere the stamped white card mat or patterned paper piece directly on to your Crumb Cake card mat and then adhere both to the Cherry Cobbler card base.

4. Raise each letter up off the card in its place with Dimensionals.

NB: I have seen on some tutorials that the letters were cut several times from white card.  Then the cut letter was stacked up and adhered together and then the stamped letter was adhered on top of that stack.  I don’t think that is necessary.  Raising up the letter with Dimensionals is quite adequate.

————————-

Now you can go and create your own Eclipse card.

Thanks for looking today.   I hope your day is going OK??

Jenny 

cards, Techniques, Tutorials

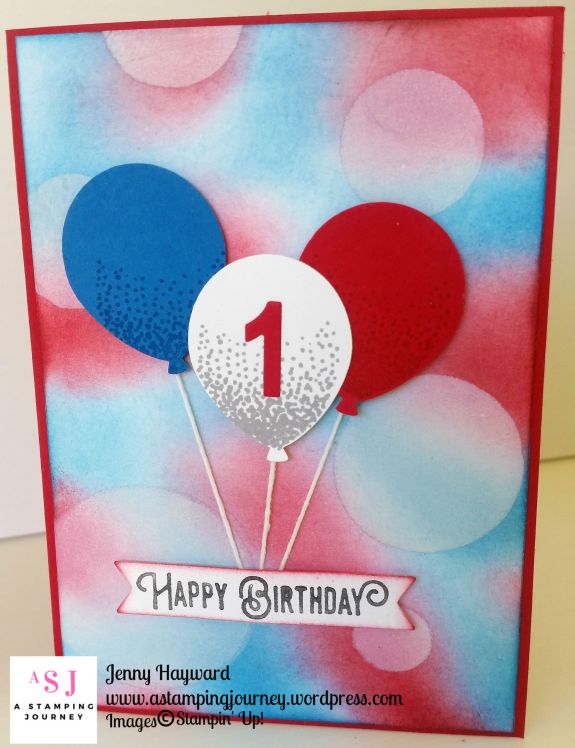
BUBBLES AND BALLOONS FOR A BIRTHDAY BOY!

I was asked by a friend to make a special birthday card for her 1 year old grandson.  The birthday theme was Red, White, and Blue and bubbles and balloons and if I could incorporate those.  Or at least either the balloons or the bubbles with the colours.  My mind started ticking over.  What to do???

So here is the card that I made.

What do you think??  

The colours were Real Red, Pacific Point and Whisper White.

The Balloons were stamped with the Balloon Celebration set and punched with the co-ordinating Balloon Punch. The number 1 is cut with the small letters alphabet dies which is now retired but they are a useful size when you need small numbers.  I added some Snail Adhesive behind  the balloons, then added a length of White Baker’s Twine.  The three strands were then adhered down near the bottom of the card and then the sentiment was added over it.

The sentiment was from the Lift Me Up set.  I went over the “Happy Birthday” with the black marker and then stamped it on to white card.  It was then cut with the Bunch of Banners Framelits.

For the bubbles effect I used the Bokeh Technique.  Have you tried that technique before?  It has been a while since I have done it.   You can find other samples HERE. with this technique. I thought I added a tutorial back then but hadn’t.  So I will add a quick one below.  There are a number of different tutorials on the internet but to be honest I find them messy.  I am so not a messy stamper.  Maybe occasionally a little inky techniques but usually I need quick and clean – and done!!

So here is a non-messy Bokeh Technique Tutorial for you.  Hopefully soon I will create a video to share with you.

Firstly, You need a piece of acetate the size of your card front and cut 3 circles of different sizes over the card.  This creates a mask for the sponging.

On a piece of Whisper White card the size of your card mat, (This piece was 10.1 cm x 14.4 cm) sponge your chosen ink colours randomly over the card.  For this I used Real Red and Pacific Point. Sometimes it can look pretty ordinary at this point but persevere.

Once your card is covered with ink then place your acetate template over the card.  Sponge Whisper White craft ink over the circles.  You will want to dab or pounce the white ink on DO NOT RUB THE INK. Move your acetate template, if you are using a smaller piece over the card to different places to sponge more circles on. If you like, overlap some circles and have some going off the edge of the card for a good effect.   Let the card dry before you finish off the card.

Thanks for visiting me.  I love that you stop by.  I see lots of people stop by from all over the world so don’t be shy.  Do say HI. 🙂

Jenny


cards, Catalogues, Stampin' Up!, Techniques, Tutorials, Videos

WATCH IT WEDNESDAY #5 – BLENDER PENS VS AQUAPAINTER!

Welcome to Watch It Wednesday #5 edition.  I have been playing a little with watercolouring lately.  (still much to learn!).  I have had a few questions from customers asking what the difference is between the Blender Pens and the Aquapainters.  I came across this video from Stampin’ Up! so thought I would share it with you.  Perhaps it will help you too with your watercolouring.  Don’t miss the fun tip at the end.

NB: If you receive this blog post update via your email the video link may not show up.  Just click on the blog post title in your email and it should take you to the blog post and you can view it there.

What did you think??  I liked the tip with the Reinkers.  Must try that sometime.  I think the effect looks great.

What do you prefer to use when you are watercolouring?  I prefer the Aquapainter but it also can depend on what you want to colour and how you want it to look.  The Aquapainter gives a lighter, washed look whereas the Blender Pen gives more a look of colouring with Markers.

Just a note too:  In the video she stamped with Stazon.  Stampin’ Up! doesn’t carry Stazon any longer.  You could use the Black Archival ink pad. Be sure to let that dry a bit or give it a blast with the Heat Tool. Also, she suggested stamping on Watercolour Paper.  That is very important to stop pilling but you can also use the White Shimmer paper or even the Thick Whisper White if there is not too much water used.  I mostly use the White Shimmer paper.

The Aquapainters and the Blender Pens are available in my store now for your watercolouring.  The Aquapainters are $20 for 2 available HERE.  The Blender Pens come 3 per pack and they are dual ended (even more value).  They are $21 available HERE.  

Thanks for stopping by today for this week’s edition of Watch It Wednesday.  If there is something particular you would like to know about or to see a video of then drop me a comment and I will see how I go.

Jenny

3D projects, Blog Hops, cards, Classes, Stampin' Up!, Techniques, Tutorials

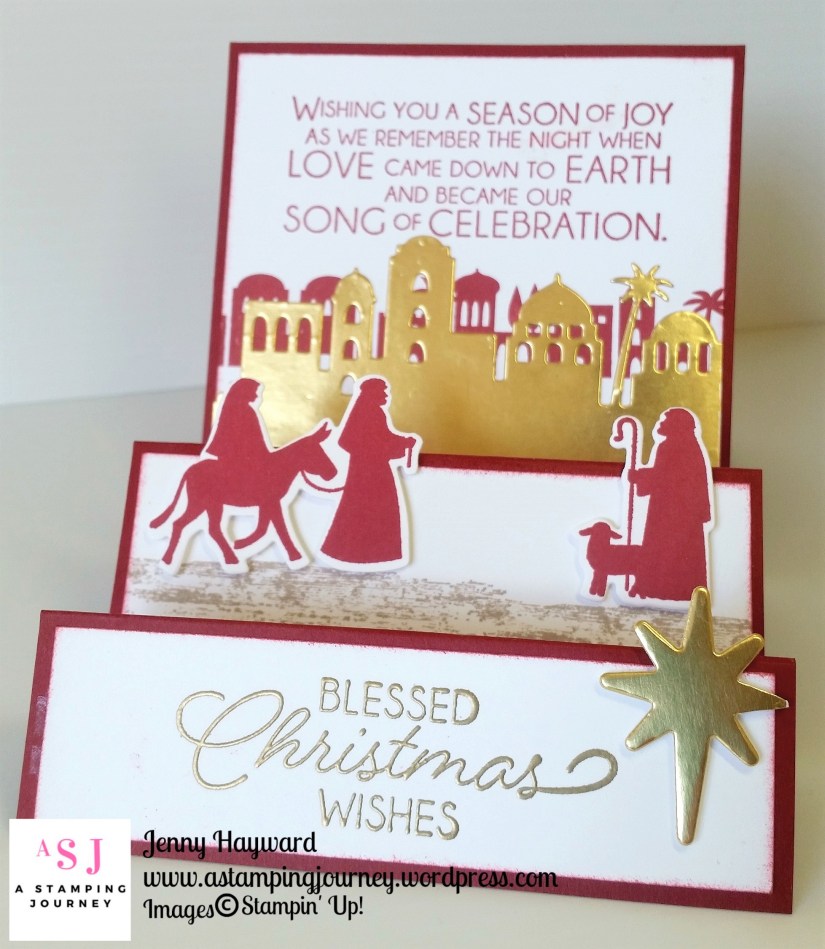
SINGLE STEP CARD TUTORIAL WITH NIGHT IN BETHLEHEM!

Yesterday I shared my Step Card I had created for the Stampin’  Dreams Blog Hop.  As time was limited yesterday as you were all on the Hop I thought I would share the tutorial for you in a separate post.  So here it is for you.

Firstly,  to refresh you this is the Single Step Card.  I have used with the Night In Bethlehem Bundle.  

The original card design I found on Patti’s blog HERE.  While it has the Imperial measurements I have worked out the Metric for you and added the Imperial measurements for you also.

SINGLE STEP CARD TUTORIAL

** Cut card to 28cm x 10.5cm  (11″ x 4 1/4″)

On the long side score at 3.2cm, 6.3cm, 10.8cm 15.2cm and 21cm     (1 1/4″, 2 1/2″, 4 1/4″, 6″ and 8 1/4″)

For back panel piece: Cut card 10.5cm x 10.5cm (4 1/4″ x 4 1/4″)

** The White mat pieces are:

Back mat piece – 10.1cm x 10.1cm (4″ x 4″)

Middle mat piece – 10.1cm x 4.1cm (4″ x 1 5/8″)

Front mat piece – 10.1cm x 2.8cm (4″ x 1 1/4″)

** To fold the card:

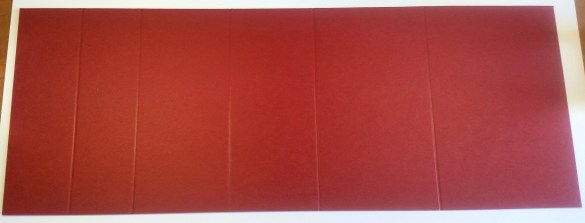
With the narrowest scored section on the left end start folding it concertina style.  On the score lines fold into a mountain fold, then next one a valley fold, then a mountain fold, then a valley fold, then a mountain fold.  See the photo below.

Then you can decorate the card as you like.

I hope you like it.  It’s a very simple card. I would love to see your version if you create one.  Do send me an email. 🙂

Thanks for stopping by,

Jenny

3D projects, Blog Hops, cards, Catalogues, Christmas, Stampin' Up!, Tutorials

STAMPIN’ DREAMS BLOG HOP – SOMETHING DIFFERENT!

I am joining in with the Stampin’ Dreams Blog Hop today.  You would have come from Jenny Hall’s blog (HERE) coming all the way from the US. Or you have just started here. Thanks for stopping by either way.

The theme this month is Something Different.  A fold, a technique, something we have been wanting to try but haven’t as yet.  Really! That’s an open minefield.  I like doing different card folds so thought I would try a different.

This Fun Fold really is simple but I think it is fun.  This is a Step card and  I haven’t done a Single Step card before.  For this I used the Night In Bethlehem Bundle.

I love how you have the stamps and the matching dies in the bundle making it so easy to create your images.  No scissors required Thank you very much. 🙂  I lightly sponged around the edges of the white card to soften the edges.

The sentiment on the bottom panel has been heat embossed in Gold. For the ground under the figures I used a stamp from the Timeless Textures set.  I like the effect that created.  Edited to add: The base card and the stamping is Cherry Cobbler.  It is a bit hard to tell in the photo. 🙂

As you are all busy hopping today I don’t want to take up much of your time.  Stop by tomorrow and I will have a tutorial for you to create your own step card.

For now you need to continue on with the Hop.  You can head off now to Sue’s blog HERE.  She creates amazing projects so be sure to stop by.

See you tomorrow for the Step Card Tutorial.  

(Edited to Add: The tutorial is now available at the next post.  You can find that HERE.)

Jenny

3D projects, cards, Techniques, Tutorials, Videos

WATCH IT WEDNESDAY #4 – TYING THOSE PESKY BOWS!

#4 WATCH IT WEDNESDAY is all about tying those bows.  If you come to my classes you can hear the groans every time I say we have a bow! 🙂 🙂

If you are groaning at the mere mention of tying bows yourself then never fear. I have put together a short video to show you how I tie my bows. I hope it is helpful.

NB: I am just starting out on this video venture so be patient with me.  I do appreciate your feedback though (good or bad) and hope that I can share more videos with you with a little more practice. 🙂

TYING BOWS THE EASY WAY!

Did you find that helpful??  Yes / No / Maybe / Perhaps stop this video gig before you get started???  😉

Thanks for stopping by today,

Jenny


cards, Stampin' Up!, Techniques, Tutorials

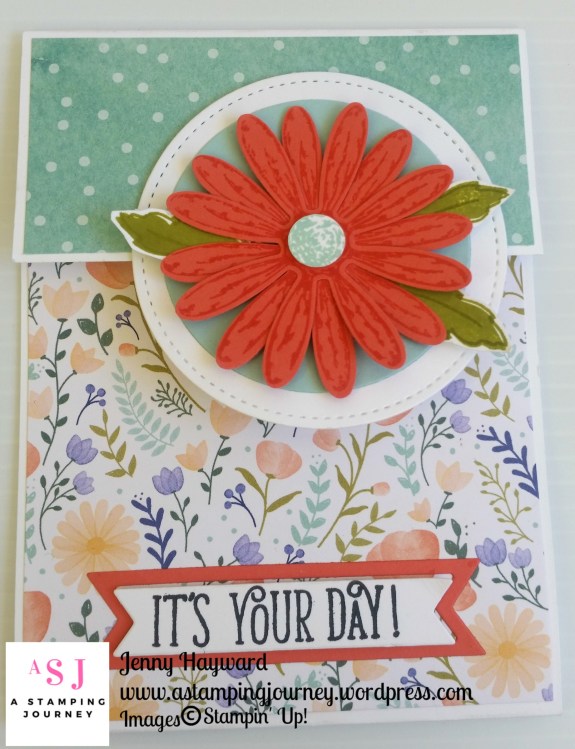
A FLAP FOLD DAISY CARD!

This card I am showing you today was actually the first card I made with the Daisy Delight Bundle.  Usually my first couple of cards with a new set I turn to Pinterest and CASE a card.  I liked the idea of this card.  It is a Flap fold card.  Just a little different to the standard card.  I CASED it from Janet’s blog HERE.  I will give you the measurements shortly.  Janet has just the imperial measurements for her card but I will give you the Metric as well as the Imperial. First I guess you want to see the card.

Isn’t the Delightful Daisy Designer Series Paper just gorgeous??  On the top flap I stamped the Daisy in Calypso Coral twice and punched them out.  They were layered together and off-set slightly.  The centre was stamped in Pool Party and punched with the 1/2″ circle punch. I stamped the leaves in Old Olive for the outline and the solid image.  These were hand cut. The Daisy was then layered on a circle cut with the Layering Circle Framelits in Pool Party and then a larger one with the Stitched Shapes Framelits.  

The sentiment is from the Happy Birthday Gorgeous set. I made a discovery when I cut the sentiment out using the Straight banner die from the Bunch of Banners Framelits.  I cut the white card which I had stamped the sentiment on and it had left the centre where that was stamped but also a banner frame. So I cut another Banner in Calypso Coral to create a frame.  Cool trick!

Here is the inside of the card.  Just a simple “happy birthday” from the Happy Birthday Gorgeous set.

I think I have to make some more of these cards.  Do you want to make one?  Here is how.

FLAP FOLD CARD

Metric: Cut an A4 sheet of card lengthways in half.  This will measure 29.7cm x 10.5cm.  Score on the long side at 10.5cm and 14cm.

Imperial:  Cut standard card lengthways to measure 11″ x 4.25″.  Score at 2″ and 7.5″.

Your Designer Series Paper pieces for the front panels are cut just slightly smaller.

Thanks for visiting.  Have a great weekend,

Jenny

cards, Catalogues, Christmas, Stampin' Up!, Techniques, Tutorials

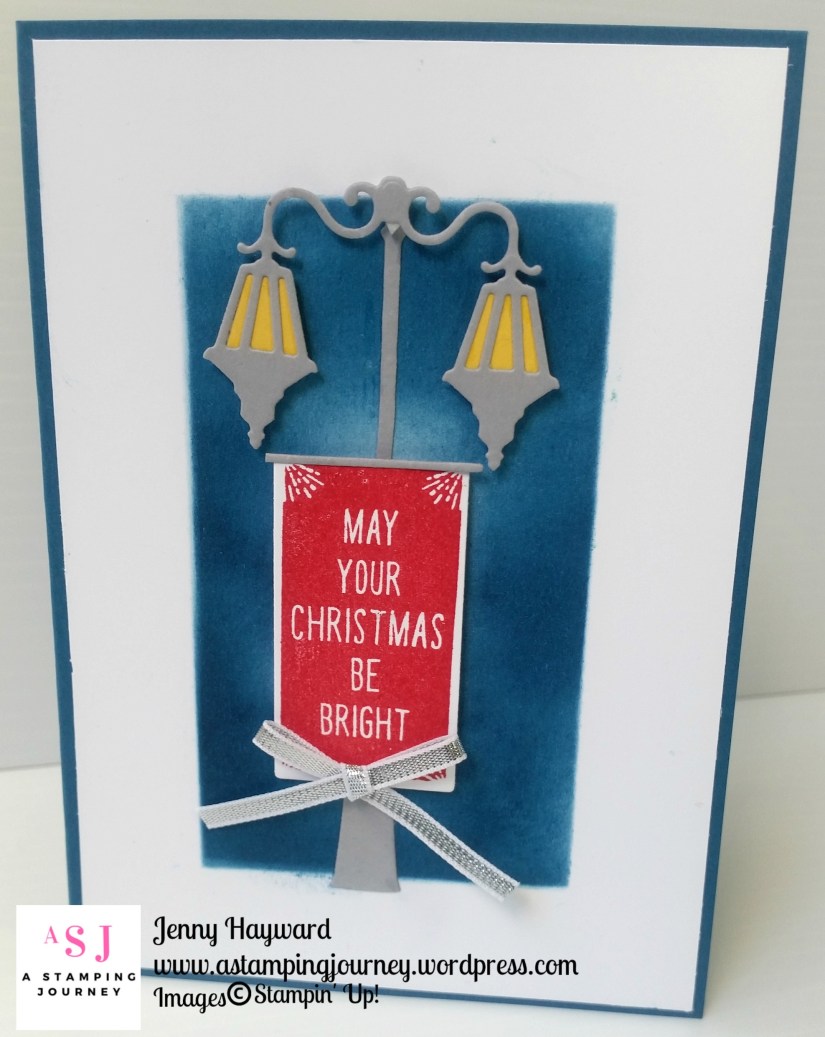
MASKED BRIGHTLY LIT!

I finally had a chance to quickly play with this new stamp set Brightly Lit. I like it as it is something a little different for Christmas.  Not that we have lamp posts like these ones but that’s OK.
Usually when I first play with a set I head to Pinterest and CASE a card.  For this card I CASED one of Amanda’s cards at the Craftspa.com.  You can see her card HERE.

I liked it as it had a masked sponged background. This was my version.

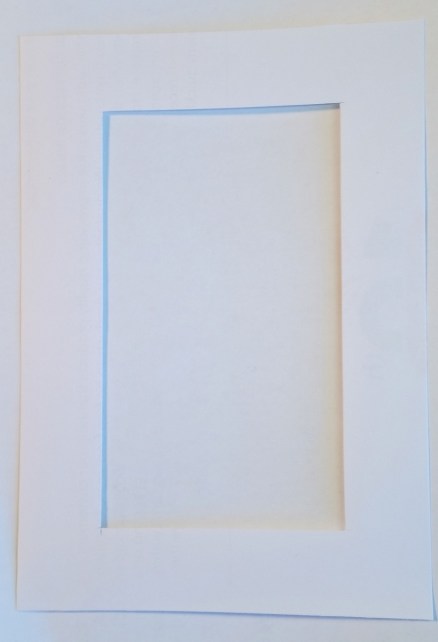
To create your sponged area: first cut a rectangle in your piece of copy paper.  I used the Stampin’ Trimmer to do this.  You could cut any shape you like with the Framelits too.  Below is the rectangle I had.  It is 2cm border each side (or 3/4″). Have the piece of Copy paper the same size as your card mat (whisper white) to be sure you cover the whole piece.  You can adhere the piece on your card with some non-permanent adhesive in a couple of spots or hold the frame in place where you are sponging at the time so it doesn’t move.

I will try to do a video soon but just a note with the sponging: Start with your lighter colour and start off the inside framed area each time you pick up ink.  Move in a circular motion from the outside moving in and along.  I used Marina Mist.  Then pick up a darker colour and just sponge near the edge in a circular motion once again.  This time I used Dapper Denim.  You can lift off an edge carefully and see how it is looking if you like to.  You want to leave a lighter area in the middle.

To finish the card I adhered this to a Dapper Denim card base.  Then add the light post and lamps cut from Smoky Slate.  The centre lights were cut from Daffodil Delight.  The sentiment stamped in Real Red and then cut with the matching Framelits. I added a Silver Taffeta bow to finish.

I have another card with this set to share next time.

Jenny

The Brightly Lit Bundle is available in my store Now -> HERE for $72.   Please use the HOST CODE:  HSVFAXRX