cards, Catalogues, Stampin' Up!

PERENNIAL POPPY!

I made this card sometime ago.  Just being able to share it with you now.

I wanted to show the Diecut pattern background and see how it looked.  I will say.  I’m not sure on this one BUT I’m putting it out here for you. 🙂

I have used the Poppy Moments dies.  The background was diecut on the Balmy Blue card and the leaves stamped over it.

The Piece was layered on to a piece of the Perennial Essence Designer Series Paper for a subtle effect.

I diecut the poppy.  On the white piece I sponged some Flirty Flamingo ink on  the centre.

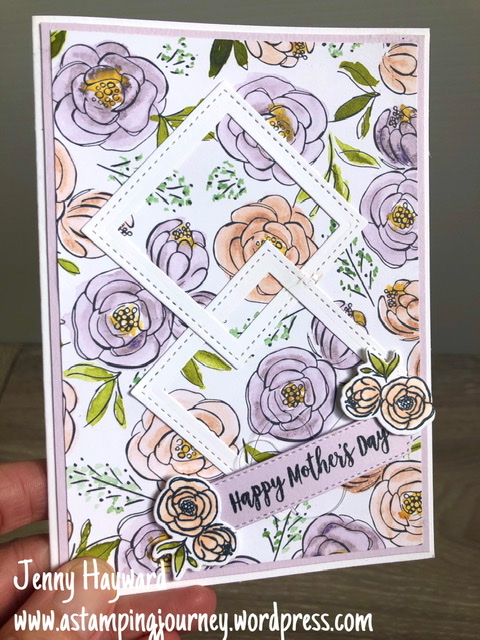
The sentiment was diecut with the Stitched So Sweetly Dies.

I hope that this card gives you some inspiration.

The Poppy Moments Dies are carrying over in to the new catalogue.  Buy them now as a Bundle with the Peaceful Moments stamp set so you can save 10%.

See and order in my store >HERE.

For the next week I have a special gift with your orders.

Have a great weekend.

Jenny


cards, Catalogues, Stampin' Up!, Techniques

WEDNESDAY’S WOW! #102 – EMBOSSED BREATHTAKING BOUQUET!

Wednesday’s WOW! #102 – Creating Feathery Ribbon.

I have a fun technique to show you today.  I wanted to show you how you can create these wispy, feathery threads on your cards. You can see it on this card below.

Check out the feathery threads.  This is a really cool technique. I have outlined it below.

This is using the Gold Edged Ribbon.

Trim off the Gold edges of a length of the ribbon.

Then gently pull out the threads of the ribbon to wisp them and give that feathery look.  It will be easier to start from one end. You can use the Piercer or a large needle if that helps. You pull off the small threads running across too.

I found it helpful too to hold the centre of all the threads as you can, to keep them all together.

Once you have the threads, hold the threads carefully together and tie them in a bow. Trim the length as you like.

+++

It’s a cool effect isn’t it? Vanessa showed us how to do this when we made the card at our team meeting a few months ago.

What do you think?  It’s a cool effect don’t you think?  Must try it again.

Below is a PIN-IT image for you to pin to Pinterest to have on hand.

+++

I will tell you more on how I created the rest of the card too.

The card is using the retiring Breathtaking Bouquet which is a background stamp from the current Occasions Catalogue.

This is actually a one layer card but has so much shine.

The Breathtaking Bouquet background is stamped on  the front of the card with versamark and then heat embossed in Gold Powder. 

It is also heat embossed in Gold on to Black card too.  The black card piece is trimmed around some of the outline of the flowers. Then the feathery bow was adhered with a glue dot on the sentiment piece.

This large Background stamp is still available.  Check it out in my store now -> HERE.

Thanks for looking.

Jenny


cards, Catalogues

ORNATE BEAUTIFUL FRIENDSHIP!

I really haven’t used this Beautiful Friendship stamp set enough.  I’m glad it is carrying over to the new catalogue.

I will say it took a few attempts to stamp the flowers in a way I was happy with.  Although really, you can’t go too wrong. Ink colours used was Calypso Coral, Balmy Blue, Mossy Meadow and Petal Pink.

The white stamped card was layered on to a piece of the Calypso Coral card that was diecut with the Ornate Frames Dies. 

The sentiment was heat embossed in white on to Black card and diecut with one of the Stitched Nested Labels Dies.

I’m glad I can still play with this set a little more. It is a gorgeous set.  Have you got it?

Thanks for looking.  Have a great week,

Jenny

3D projects, cards, Catalogues

MOTHER’S GIFT BAG AND CARD!

With Mother’s Day this weekend I have a Gift Bag and Card set to share with you.

This gift bag and card is created with the Best Dressed Suite.

Best Dressed Gift Bag and Card

With all the cool images on this piece of Best Dressed Designer Series Paper I didn’t need to do a lot of stamping.

I did stamp the perfume bottle from the Dressed To Impress stamp  set and coloured it to match the paper.  The bottle was stamped with the “splodge” stamp in Daffodil Delight.  Then the top was coloured with the Smoky Slate Stampin’ Blends. 

To finish the card I added some loops off the Mint Macaron Sheer Ribbon behind the Purple Posy diecut circle. I used both of the sentiment shapes and layered them together.

For the bag diecut the bag twice in the Mint Macaron card and then diecut two from the paper.  Then trim off the sides of the paper diecut piece and adhere them on to the bag.

For the tag I cut the perfume bottle off the paper to match it all.

A sweet little gift set for any special person.

This Dressed To Impress Bundle of the stamps and dies will be carried over in to the new catalogue but buying it now as a bundle will save 10%.  The paper won’t be carried over so if you want it grab it now.

See it in my store now -> HERE.

Thanks for stopping by,

Jenny

cards, Catalogues, Classes, Videos

ONLINE MOUNTAIN AIR BUNDLE CLASS!

We might not be able to meet in person for classes at the moment BUT we can still keep stamping.

Join in my Online Mountain Air Bundle Class. Wherever you are – you can join in someway.

Create 3 fun projects with the Mountain Air Bundle. You can see  the sneaks in the photo above.

Choose one of the 3 options below.

All 3 options are available for Australian residents only. Tutorial/Video option available to residents overseas.

1) Receive the Card Kits for 3 projects as shown in the Sneak Photo above. Plus also the Project Tutorials with Step-By-Step Instructions and photos of additional projects. Also receive a Video to show you how to create the projects. $20

2) Tutorial and Video only $10

3) Receive the Card Kit, Tutorial and Video at a reduced Price with the Purchase of the Mountain Air Bundle. $99
(Mountain Air Bundle + Shipping total is $93.95)

Also, although the Mountain Air stamps and dies are carrying over to the new catalogue in June by purchasing the Mountain Air Bundle now you will save 10%.

Orders for the Mountain Air Class must be in by Friday 15th May.

Reply via Email or comment here.

Payments via Paypal or Bank Transfer.

Let me know ASAP

Jenny

cards, Catalogues

BEST DRESSED MOTHER’S DAY CARD!

You don’t need to do a lot to create a card for Mum for Mother’s Day. The gorgeous Best Dressed Designer Series Paper does it all.

After adhering some of this pretty print on to the card I diecut 2 frames from white card using the Stitched Rectangles Dies and the Layering Squares Dies together. To interlock them I cut one and then could slip the frame through the other one.

The flowers are stamped with Memento Ink and coloured with the StampinBlends. The sentiment is stamped on Purple Posy card and cut with the sentiment die in the All Dressed Up Dies.

Paper makes cardmaking so easy. You can’t go wrong with this gorgeous paper either. I hope you grab some of this paper before it goes. It’s available in my store now.

Happy Creating,

Jenny

cards, Catalogues, Challenges

PAINTED POPPIES FOR A CHALLENGE!

Over the last week I encouraged members in my Facebook group to create a card. Each day I posted an element for a card with the card measurements and other pieces. By the end of the week they could create their card and share it with the group.

It was a fun activity and I was so excited to see people share that wouldn’t normally share in the group.

This was my card I created. I actually made this Saturday week ago in Anzac Day but I couldn’t share this until now.

I have used the Painted Poppies Stamp set. The poppy is coloured with the StampinBlends. The sentiment is from Positive Thoughts.

You can join my Facebook group wherever you are. Drop me a comment or email and I can add you.

Have a happy day,

Jenny

cards, Catalogues

LOVE WHAT YOU DO IN PETAL PINK!

I shared cards in last post using the Love What You Do set. While I had the stamp set out I created another card that I wanted to share with you today.

Colours: Memento Black, Petal Pink, Lovely Lipstick.

Card: Petal Pink, Whisper White, Bird Ballad Designer Series Paper.

The sentiment is from the retiring Colorful Seasons Stamp set. The Embossing Folder is the Country Floral 3D Embossing Folder.

You will want to grab this set before it retires. It’s a really lovely set. Head to my store -> HERE. Click Shop Now.

Thanks for visiting me today.  Have a great week.


Jenny

Blog Hops, cards, Catalogues, Stampin' Up!

ESAD MAY 2020 – SEE YA LATER FAVOURITES BLOG HOP!


Welcome to the ESAD See Ya Later Favourites Blog Hop. You have come from HERE with the gorgeous creations of Bronwyn, or you are starting on my Blog.

Our Blog Hop today is to feature one of our favourites products. I have chosen the Love What You Do Stamp Set.

I used this set a lot when it first came out and I have to say it got pushed aside with all the other lovelies arriving. When I pulled my retiring products off the shelf this week this one made me sad. So I thought it was time to ink it up again.

I have made a set of 3 simple cards for you today.

We have 3 different colours – Flirty Flamingo, Highland Heather and Granny Apple Green/Old Olive.

On the white card mat on each one I embossed the card with Subtle Embossing Folder.

On the Flirty Flamingo card above the flowers were coloured with the Light and Dark Flirty Flamingo Stampin’ Blends.

The Highland Heather card above was stamped with the Highland Heather inkpad and using the “splodge” stamp in the set.

For this card above I stamped the leaves in Old Olive and Granny Apple Green.

Now you can continue on your Way. You are off to Mandy’s blog now. Just click on the NEXT arrow below or click on the list.

If you get lost you can follow along with the list below.

Blog participant list

  1. Kelly Kent
  2. Nicole Wilson
  3. Denise Buetler
  4. Sue Vine
  5. Melissa Gifford
  6. Mae Collins
  7. Sharni Haines
  8. Lou Kitzelman
  9. Rebecca Scurr
  10. Libby Dyson
  11. Narelle Fasulo
  12. Cathy Pinchbeck
  13. Lynsey McCord
  14. Bronwyn Eastley
  15. Jenny Hayward
  16. Mandy Depiazzi

Happy Hopping,

Jenny

cards, Catalogues

IN THE TROPICS DAISY!

I had this idea in my head for a little while and thought I would give it a try. I have to say it didn’t work out as well as I had imagined. But, … I’m going to show anyway.


When I first saw the pineapple top in the In The Tropics Dies I wondered if it would make a grassy clump. That idea could work with the Daisy Lane set or similar.

After I cut the “grass” I sponged the ends with the Old Olive ink.

The patterned paper is from the Best Dressed Designer Series Paper pack.

The sentiment is from the Itty Bitty Greetings set and was cut with the Stitched So Sweetly Dies.

What do you think of this idea? Yay or Nay?

I’m keeping this brief today. Our computer has died so doing this on the IPad and Phone. I’m adaptable right. 😆 So apologies roday for the standard of the post.

Thanks for visiting me.

Jenny