cards, Stampin' Up!

BIRD BALLAD WEEK DAY ONE – PRETTY PAPER!

It’s Bird Ballad Week this week. 

This is such a gorgeous group of products that have shown to be very popular if you have been looking around the internet. I know I have been having fun creating with them and I have lots to share with you.

Isn’t this just the prettiest paper?? You don’t need much more to it.  The sentiment is from the Free As A Bird stamp set on a strip of Calypso Coral card. I just angled the end and then added some loops of Linen Thread behind. To do this I wrapped the Linen Thread around my fingers a few times and added that to the back of the card strip by adding Snail Adhesive to the back of the strip. It’s a quick and easy card.

The Bird Ballad Bundle includes the Free As A Bird stamp set and the Stitched Nested Labels Dies.  You can also buy them individually and also the Bird Ballad Designer Series Paper. All  GORGEOUS!!

In Australia? You can buy them in my store now -> HERE. $89 AUS for the Stamps and Die Bundle. Please use the Host Code: H2BBRFTE

See you again tomorrow.

Jenny

Blog Hops, cards, Catalogues

STAMPING AROUND THE WORLD JUNE BLOG HOP – DAISY LANE!

It’s time for another exciting Blog Hop with Stamping Around the World Team.  You might have come from Linda’s Blog HERE or starting on my blog.  Either way.  Enjoy seeing all the amazing projects from Demonstrators around the World. 

Each month the team all contribute tutorials to send out as a Thank You for  when you order with any one of us.  That’s pretty exciting – and I can tell you these projects have been pretty amazing AND they are exclusive too so you won’t see them anywhere else.  I am honoured to be a part of it.  

The idea with these Blog Hops is to share a project with you with products we have used in our Tutorial for the month.  I have used the new Daisy Lane Bundle.  

Today I have 2 cards using the Daisy Lane stamp set and the Medium Daisy Punch.  I have also used the larger Daisy Punch.

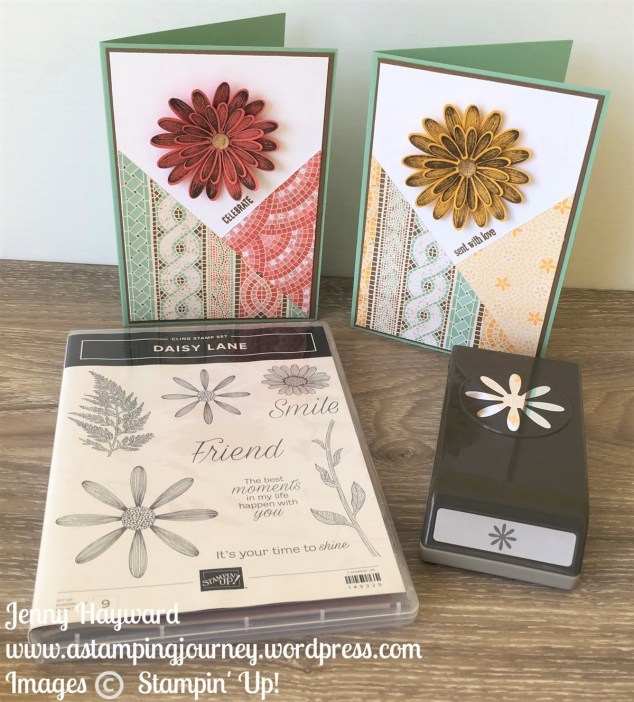
The layout for the cards was based on the Freshly Made Sketches #339.  I thought it was a great way to use the paper. On these cards I used the Mosaic Mood Specialty Designer Series Paper.

It’s great way to show off the both side of the paper.  The Designer Series Paper needs to be square and to be the width of the white card mat whatever size you choose to make the card in.  These are standard card sizes.  See the measurements below.

Card Measurements:

Card Base: Mint Macaron 14.8cm x 21cm Scored at 10.5cm (5 1/2″ x 8 1/2″ Scored at 4 1/4″)

Soft Suede Card Mat: 10.1cm x 14.4cm (4 1/8″x 5 3/8″)

Whisper White Card Mat:  9.7cm x 14cm (4”x 5 1/4″)

Designer Series Paper:  9.7cm x 9.7cm (4″x 4″).

Cut the DSP diagonally and flip one side.  For these cards I used 2 different prints in the pack and actually swapped one half with the other as I thought the colours worked better together.

See the cards close up

I have punched 2 flowers of each size and layered them together.  The flowers were stamped in Soft Suede. and I used the Gold Faceted Gems in the centre of the flowers.

The sentiments are from the Itty Bitty Greetings stamp set.

Now the Daisy Lane Bundle is in store now -> HERE for $61 AUS When shopping in store please use the Host Code: H2BBRFTE

If you have the Daisy Delight set and the larger Daisy Punch then this is a great compliment to them and will really extend your creating so you can make the layered daisies in both sizes.  You can grab those in my store too if you haven’t already got them. With your qualifying orders you will get the Tutorial bundle with 12 projects that I will send out to you.

Now you can head off on the hop again and head to Jo Anne’s blog HERE or follow the arrows.  If you get lost follow the list below.


Eva Pottsova (Crafting with Angels)

Rebecca-Jo Unwin (Rebecca-Jo Unwin)

Stefanie Pletscher (The Crafty Medic)

Donna Gray (Stamping with Donna G)

Sue Allen (Sue Allen Simply Craft)

Linda Handford (Stampin by the Beach)

Jenny Hayward (A Stamping Journey)

Jo Anne Hewins (Luv 2 Create)

Lori Mueller (Stampin’ Dreams)

Margriet Siekman (Creatief met Marsie)


Thanks for visiting. Enjoy hopping! 🙂

Jenny

cards, Catalogues

NEW WONDERS CHALLENGE CARD!

It was a long weekend here for us this weekend.  With a little extra time and for something fun we had a different kind of challenge on my Facebook group.  I got the group members to design my next card.  Twice on Saturday and then on Sunday I set a Poll with different categories for the card each time. There were 4 different options in each category and they could vote on it.  The categories were Stamp sets to use, Colour Collection, Style and shape that must be on it.

The end result was that the stamp set New Wonders was chosen using Subtles colours.  It was to be in Vintage style (which is not one I do much of) and it had to have a oval on it.  So do you want to see the card??

I was happy that this set was chosen as I have been using this a bit lately – and it is a bit sweet. 🙂 I posted some cards yesterday here on my blog.  Head back a post if you missed it.  I think I pulled the vintage style off ok as it is not my usual style. I used a little distressing and a little sponging.

When I put together a card from scratch myself I often turn to card sketches to help.  This one was based on this Sketch from Freshly Made Sketches #251.

Have you joined my Facebook group yet?? Head -> HERE and ask to join.

Thanks for visiting me.

Jenny

cards, Catalogues

NEW WONDERS TRIO!

I don’t really do cute-sy, But I really loved this sweet set New Wonders in the catalogue.  It arrived recently and of course had to have a play.

Disclaimer: I am not great at colouring.  And I will try and avoid it if I can.  I will say though that this set makes colouring a whole lot easier.  The designers of this set have created shadows in the images so I just followed these to give the different depths of colour.  A bit like Colour by number except with shading instead.

Here are the trio of cards for you.

I will show you them individually to get a closer look.

This one above was coloured with the Stampin’ Blends.  The Highland Heather mat is embossed with the Lace 3D embossing Folder.

The top one here is coloured with the Stampin’ Blends as well.  I have to say this was the second attempt at colouring this one.  It wasn’t going well. I outlined the little fairy image with the Light Petal Pink Stampin’ Blends to give it some dimension.  It’s much softer than the grey I usually use. I have used the Swirls and Curls Embossing Folder with this one.  I love the sweet sentiments in this set too. Behind the diecut circle the image is on I diecut a scalloped circle in the Dazzling Glimmer Paper.  That is a little hard to see though.

This one above in Rococo Rose is coloured with the Watercolor Pencils.  While the Stampin’ Blends are easy to use I do prefer to colour with the pencils.  I feel I have a little more control with the colours.  To highlight the “hi” I gave it a light wash with the Daffodil Delight pencil and washed it a little with the Aquapainter. I have used the gorgeous Scalloped Lace Trim on each card.

Do you like this set?  It’s a sweet one.

This New Wonders set is a Host set and only available as a Host of an event when the total orders are over $250 AUS OR if your own orders are over $250.  I have had a few of those already with people stocking up on all the gorgeous products in the catalogue.

Shop in my store now ->  HERE.  Please use the Host Code EUEAGC3N

All orders receive a little “something” from me.  And if your order is over $78 AUS receive the exclusive project tutorial Bundle to make 12 gorgeous projects.

Thanks for stopping by. And if you are in Australia I hope you have enjoyed the Long Weekend.  Maybe extra time to create. 🙂

Jenny

3D projects, cards, Catalogues, Stampin' Up!, Tutorials, Videos

WEDNESDAY’S WOW! #70 – CREATING THE PAPER MAGNOLIA FLOWER!

Wednesday’s WOW! #70 today.  I could tell you so many things today with all the exciting new products just released, but for today I have a special project.  You have probably admired the gorgeous Magnolia flowers in the 2019 Stampin’ Up! Catalogue. They are even all over the front cover. You might have even seen them online. Well today I am going to share with you how to create your own Paper Magnolia Flowers.

You just need a few supplies – The Good Morning Magnolia bundle and the Hot Air Balloon Punch.  Check out the easy to follow steps in this video.

Very simple and very gorgeous.  I like that you can make the smaller flowers too.  Ok.  Are you off to make some Magnolia Flowers now?

If you need any supplies to make this project then you can head to my store online -> HERE.

Please use the Host Code: EUEAGC3N

OR

You can contact me directly.

Orders over $78 AUS receive an exclusive 12 project Tutorial Bundle free.  Or you can purchase the Tutorial Bundle for $20


SOMETHING TO CONSIDER:

The Good Morning Magnolia Bundle is $111.50 AUS.  The Hot Air Balloon Punch is $31 AUS.  TOTAL $142.50  If there are a couple more items you like you would be better off joining Stampin’ Up! and pay $169, but you get $235 of products in total of your choice which could include these items.  That makes it so much more affordable AND can check items off your LONG wish list.  Ask me more about it.

Thanks for visiting today,

Jenny

cards, Catalogues, Stampin' Up!, Tutorials

IT’S HERE! IT’S HERE! THE CATALOGUE IS HERE!!! :)

It’s all a bit exciting! We all love new products right??  There is lots of gorgeousness inside this one.  Have you seen it yet? What is your favourite?

You can now view it online -> HERE

To help you make your Wish List as you read through the catalogue, Download an indexed Catalogue List -> HERE.

If you haven’t received a catalogue from me as yet and would like one, drop me a reply to this email.

I will be sharing lots about this catalogue including my favourites and the new Incolors. I have been creating a lot but for now go and take a look and see what you love.

But here is just one suite of products. The Bird Ballad Suite is at the top of my list.  It’s been very popular with many of you who have seen it already too.

The Magnolia Suite is absolutely gorgeous and is showing to be very popular too.

Something to consider: 

The Magnolia Bundle above with the stamp set and dies is $111.50. The complete suite of products shown above is $234.75 (including stamps, dies, cards, notes cards, envelopes, embellishments, papers).

If you like this suite it would be actually cheaper to join the Stampin’ Up! Family, choose this Suite and pay only $169. No shipping costs either. Talk to me about it or check out 10 reasons why -> HERE.

For now, read up on the catalogue and make your list.  When you are ready to order, head to my store.

TO ORDER:

Orders can now be made in my store.  Head ->HERE.

Please use the Host Code EUEAGC3N

Remember also:


New project Tutorials are out this month to create 12 new projects.  These are sent to you free as a Thank Youfor your order. (with orders over $78 AUS).
Or you can purchase the tutorials direct from me for $20 AUSwhere ever you are located in the world.
cards, Catalogues, Stampin' Up!

LAST CHANCE FOR LAST CHANCE!

This is it! Last day to get all those loved items in this current catalogue before they go.  You might have missed the Everything is Rosy Medley or the Hugs from Shelli kit so don’t miss out on these.

Some of these items are discounted. Here are some of them again just to remind you.


See the listed discounted products from the Annual Catalogue

See the Occasions Catalogue reductions 

If you are in Australia and want to order this is the place to go to shop with me Head -> HERE.

Please use the Host Code: EUEAGC3N   

Thank you for your order.  I will send a little Thank You out after you place your order so be sure to not mark it anonymous. 🙂

You can order directly with me by contacting me too.  Orders must be in by 6pm.

Jenny

cards, Catalogues, Stampin' Up!, Techniques

SUNSET WITH THE 2019 STAMPIN’ UP! INCOLORS!

Ok, maybe this is a bit of a loose title but hey sometimes it’s hard to be creative with blogging. 🙂

I have been playing with the new 2019 Incolors lately.  I will say when I first saw them I was a bit blah! BUT now I have been playing with them a bit I am really warming to them.  I will talk to you more about them in a later post but I thought we would start with this card today.  I wanted to use all the Incolors together.

I thought this reminded me of a sunset over the ocean.  That’s what it is like where I live anyway.  We have Pretty Peacock at the bottom for the grass under the lighthouse, Seaside Spray for the water, Purple Posy as the sky is changing, a little more pink with Rococo Rose and the orange with the Terracotta Tile.  Can you see it now??

Here is my inspiration.  This is our local lighthouse in Wollongong.  The sky wasn’t that orange this night unfortunately but it can get quite intense.  You just have to imagine it.

To create the card I cut equal strips of the Incolors then adhered them to a piece of Whisper White card.  This was a lot easier to line them up.  Also since I was embossing it with the Subtle Embossing Folder it made it easier to run through the machine.

I used the new Sail Away stamp set which is a really cool one. Watch out for more with this.

Stay tuned for more creating with the Incolors too.  Have a great day,

Jenny


cards, Catalogues, Stampin' Up!, Videos

WEDNESDAY’S WOW! #69 – REATTACHING THE LOCK BUTTON ON YOUR STAMPIN’ UP! PUNCHES

Do you have this problem?  The lock mechanism on your punches pop out and you can’t get them back in.  I found this video on Youtube to help you get them back in and to stop it happening in the first place.

So for Wednesday’s WOW! #69 – how to reattach the lock on your punches. I tried it and it works.

Thanks Kat for this video.  It was very helpful.

Now you can go off and fix those little locks on your punches.

Have a great day,

Jenny


cards, Catalogues, Stampin' Up!

TIME TO CELEBRATE WITH EVERYTHING IS ROSY!

I have another card for you with the Everything is Rosy Medley.  I think this one might be one of my favourites.

I had a small piece of this pretty flowery pattern from the paper pack.  It’s a shame that you can’t see the shiny Rose Gold embossed flowers.  If you have this paper you will know what I mean.  Most of the pieces in the pack have some Rose Gold embossing on it.

I cut this flowery piece in half then added them on to a white card mat with a strip of Melon Mambo. This card strip is embossed with the Subtle Embossing Folder but it is hard to see in the photo.

Before you add the piece to your Night of Navy card base wrap some of the Night of Navy ribbon around. This ribbon is gorgeous.  I would love to have more of this ribbon.  It has the Rose Gold Metallic edge to it.  Just divine!

With the Rose Gold Diecuts in the pack simply stamp one of the sentiments on the piece and add that to your card front.  I diecut one of the leafy pieces in the dies set in Melon Mambo card just for an added touch.

Have you got this medley yet?  Have you enjoyed creating with it?  You don’t realise how gorgeous it is until you unpack it do you.

If you plan on getting the Everything Is Rosy product Medley you need to be quick.  There is only a few days left.  I know it is a larger expense ($139 AUS) but I will tell you it is so much value.  Someone calculated it to be over $180 in value.  You really won’t be disappointed.  Although I think you will be disappointed if you miss out.

Head to my store now -> HERE to pick one up. Please use the Host code: EUEAGC3N

After your order is placed I will send you out an email with the 12 Free Tutorial projects for this month (These are not including Everything is Rosy projects).

Jenny